This document aims to guide users in the medical device industry through every stage of the product development process, from evaluating manufacturing methods and 3D printing technologies to specific regulatory requirements for commercializing and marketing end-use 3D printed medical devices. Throughout the document are Formlabs and Greenlight Guru resources to support users in each step of the process.

Consider Your Product Requirements
Products can naturally be produced for various applications and intended uses, including prototyping, hybrid manufacturing, tooling and manufacturing aid, and end-use (or final-use) devices.
Product Type
The type and purpose of the product can affect materials used, the volume of production, machining technique, lead time, cost, design flexibility, quality flexibility, etc. Various manufacturing methods are available to cover a wide range of applications, geometries, materials, and specifications. When choosing a method, all of the factors listed above must be considered to optimize production.
Material Properties
Once the purpose of your product is defined, you’ll need to consider the material properties required to fulfill the specified purpose. Mechanical and physical properties can affect the materials capable of producing your manufactured part. Examples of material properties include conductivity, density, ductility, hardness, toughness, tensile strength, fatigue strength, and color.
Please visit the Formlabs website for a complete list of the most common mechanical and thermal material properties, along with their definitions and functional values. Further, certain materials are compatible with specific manufacturing methods, requiring a holistic approach at the onset of the development process.
For more information on material compatibility with specific manufacturing methods, please read the “Manufacturing Methods” section in chapter 2. For more information on additive manufacturing material properties, please refer to chapter 3.
Volume + Throughput Requirements
As briefly mentioned above, your part may have particular volume and throughput requirements depending on the product type and purpose. Different manufacturing methods are optimized for varying volume and throughput requirements, impacting each technique’s cost, quality, and manufacturability of specific devices.
For more information on each manufacturing method and their optimal use cases, including volume and throughput considerations, please refer to the “Manufacturing Methods” section in chapter 2.
Evaluate All Manufacturing Methods
When evaluating manufacturing processes’ feasibility and selecting one for your product or component, consider the following factors:
Identifying Production Factors and Considerations
Form: Do your parts have complex internal features or tight tolerance requirements? Depending on the geometry of a design, manufacturing options may be limited, or they may require significant design for manufacturing (DFM) optimization to make them economical to produce.
Volume/cost: What’s the total or the annual volume of parts you’re planning to manufacture? Some manufacturing processes have high front costs for tooling and setup but produce inexpensive parts on a per-part basis. In contrast, low-volume manufacturing processes have low startup costs. Still, due to slower cycle times, less automation, and manual labor, cost per part remains constant or decreases marginally when volume increases.
Lead time: How quickly do you need parts or finished goods produced? Some processes create the first parts within 24 hours, while tooling and setup for certain high-volume production processes take months.
Material: What stresses and strains will your product need to stand up to? Several factors determine the optimal material for a given application (see the “Material Properties” section in Chapter 1 if you need a refresher). Manufacturers must also balance cost against functional and aesthetic requirements. Consider the ideal characteristics for your specific application and compare them with the available choices in a given manufacturing process.
Manufacturing Methods

Image: Compare different manufacturing methods by considering cost per part, volume, lead time, and ability to manufacture complex parts. Read below for more details on each of these processes.
3D Printing
3D printers create three-dimensional parts directly from CAD models by building material layer by layer until a complete physical part is formed. They can be compatible with both plastics and select metals. For more information on 3D printing materials, please refer to the “Print Materials and Properties” section of Chapter 3.
As 3D printers require no tooling and minimal setup time for a new design, the cost of producing a custom part is negligible in comparison with traditional manufacturing processes. However, 3D printing processes are generally slower and more labor-intensive than manufacturing processes used for mass production. As 3D printing technologies improve, cost per part continues to fall, opening up a more comprehensive range of low- to mid-volume applications.
CNC Machining
CNC machining includes mills, lathes, and other computer-controlled subtractive processes. These processes start with solid blocks, bars, or rods of metal, plastic, or wood shaped by removing material through cutting, boring, drilling, and grinding.
Unlike most other plastic manufacturing processes, CNC machining is a subtractive process where the material is removed by either a spinning tool and fixed part (milling) or a spinning part with a fixed tool (lathe).
Machining is ideal for low-volume applications that require tight tolerances and geometries that are difficult to mold. Typical applications include prototyping and end-use parts like pulleys, gears, and bushings.
Polymer Casting
In polymer casting, a reactive liquid resin or rubber fills a mold which reacts chemically and solidifies. Typical polymers for casting include polyurethane, epoxy, silicone, and acrylic. RTV silicone molds can reproduce even the smallest details, yielding high-quality cast parts.
Rotational Molding
Rotational molding (also called rotomolding) is a process that involves heating a hollow mold filled with powdered thermoplastic and rotated around two axes to produce mainly large hollow objects. Methods for rotomolding thermoset plastics are available as well, however less common. The molds can be fabricated, CNC machined, cast, or formed from epoxy or aluminum at a lower cost and much faster than tooling for other molding processes, especially for large parts.
Rotomolding has some design constraints, and finished products have looser tolerances. As the entire mold has to be heated and cooled down, the process also has long cycle times and is quite labor-intensive, limiting its efficiency for higher volume applications.
Vacuum Forming
Vacuum forming is a manufacturing method where plastic is heated and formed, typically using a mold. Vacuum forming machines vary in size and complexity from low-cost desktop devices to automated industrial machinery. Commonly vacuum-formed parts include product packaging, shower trays, car door liners, boat hulls, and custom products like dental aligners.
For more information on vacuum forming, please visit the Formlabs website.
Injection Molding
Injection molding (IM) works by injecting molten thermoplastic or powdered metal into a mold. It is the most widely used process for mass manufacturing plastic parts. Injection molding can produce highly complex parts, but certain geometries will significantly increase the cost.
Extrusion
Extrusion molding works by pushing plastic or metal through a die. The shape of the die is a cross-section of the final part. Forms and shapes manufactured with extrusion are limited to products with continuous profiles, such as T-sections, I-sections, L-sections, U-sections, and square or circular sections. Typical applications include pipes, hoses, straws, and window frame moldings.
Blow Molding
Blow molding is a manufacturing technique used to create hollow plastic parts by inflating a heated plastic tube inside a mold until it forms into the desired shape. Blow molding is the most common process for creating hollow plastic products at scale. Typical applications include bottles, toys, automotive components, industrial parts, and packaging.
Please visit the Formlabs Guide to Manufacturing Processes for Plastics for more detailed information on each of these processes.
Sand Casting
In the sand casting process, a foundry worker fills mold boxes or flasks with a mixture of sand and binder, then packs sand around the pattern. The pattern is removed to leave a negative impression of the pattern behind, and molten metal is poured into the cavity.
An open-faced mold may be used for parts with features on a single side. Parts with features on multiple surfaces require closed cavity molds with upper and lower mold boxes.
For more information on sand casting and investment casting, please visit the Formlabs article on Metal 3D Printing Alternatives.
Compare Additive Manufacturing Methods and Materials
Now that we have discussed a few manufacturing methods, we will focus on one of the newer and most rapidly evolving ones: 3D printing. The 3D printing or additive manufacturing market has undergone rapid change in recent years. No longer primarily the domain of hobbyists, sophisticated desktop machines have developed into essential tools for businesses.
After becoming the go-to tool for prototyping and product development, 3D printing has expanded across manufacturing, dentistry, jewelry, and more. Please read below for more information on the most common 3D printing methods, including how they work and their pros and cons.
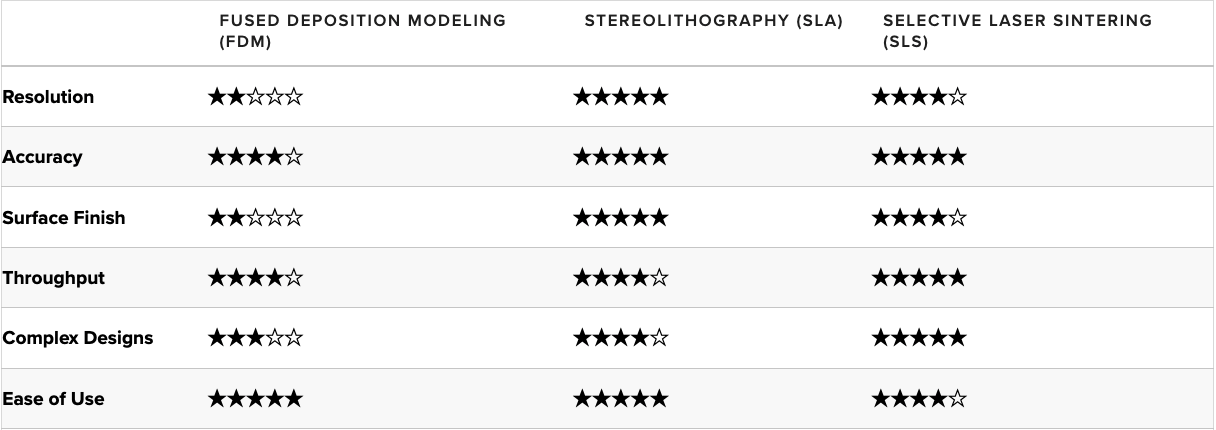
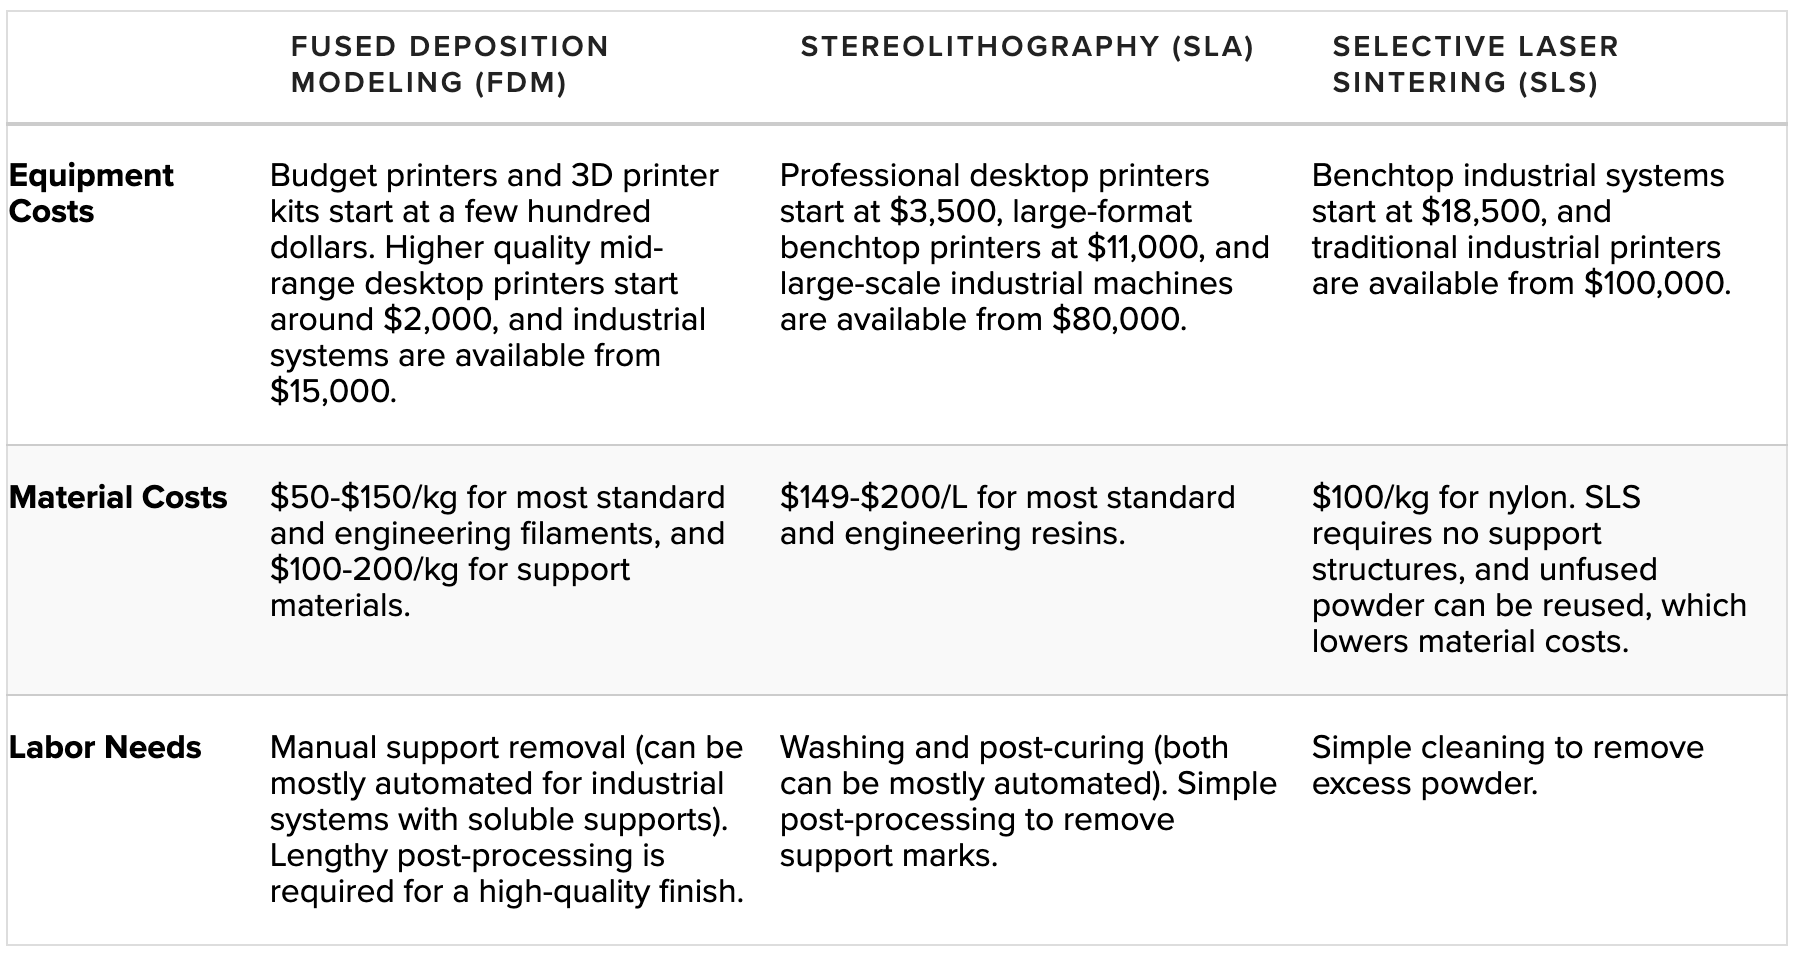
Print Methods
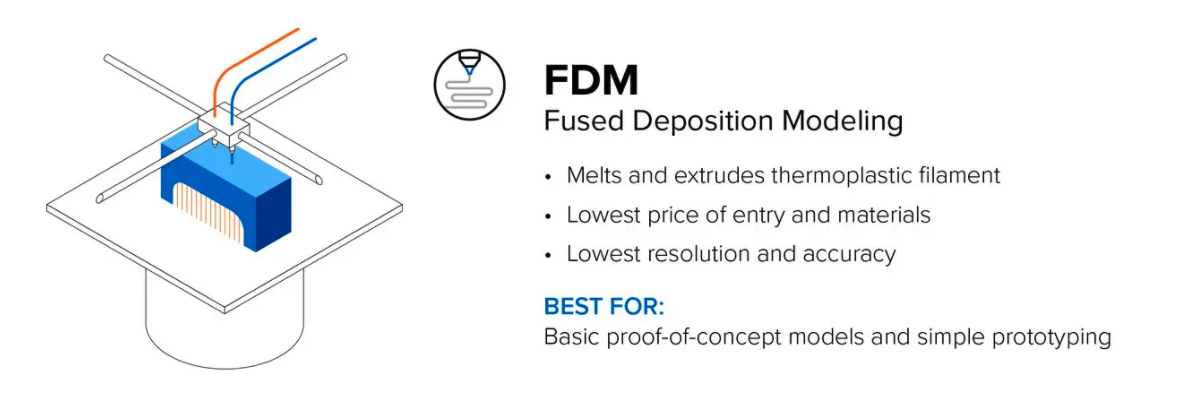
Fused Deposition Modeling (FDM)
FDM is the most widely used type of 3D printing at the consumer level. The FDM 3D printer functions by extruding molten thermoplastic (or metal) in layers onto a build area or platform until the 3D object is formed. Industrial-grade FDM 3D printers make use of a variety of thermoplastics.
Pros:
-
FDM 3D printing is the quickest printing process compared to other technologies. This makes it an excellent solution for 3D printing prototypes and iterative prototyping.
-
FDM works with diverse materials which support experimentation and prototyping
-
Industrial-grade FDM 3D printers can be equipped with relatively large build volumes that allow them to produce larger 3D models.
Cons:
-
FDM sports a lower resolution and accuracy level compared to other 3D printing technologies. Finished prints come with layer lines and require extensive post-processing activities to get high-quality printed objects.
-
FDM struggles to produce components with complex geometries at the high accuracy levels that medical devices require
-
Suppose attention to detail is a crucial requirement for producing a functional medical device. In that case, an FDM 3D printer will struggle to achieve excellent detailing due to its layered extrusion of filament.
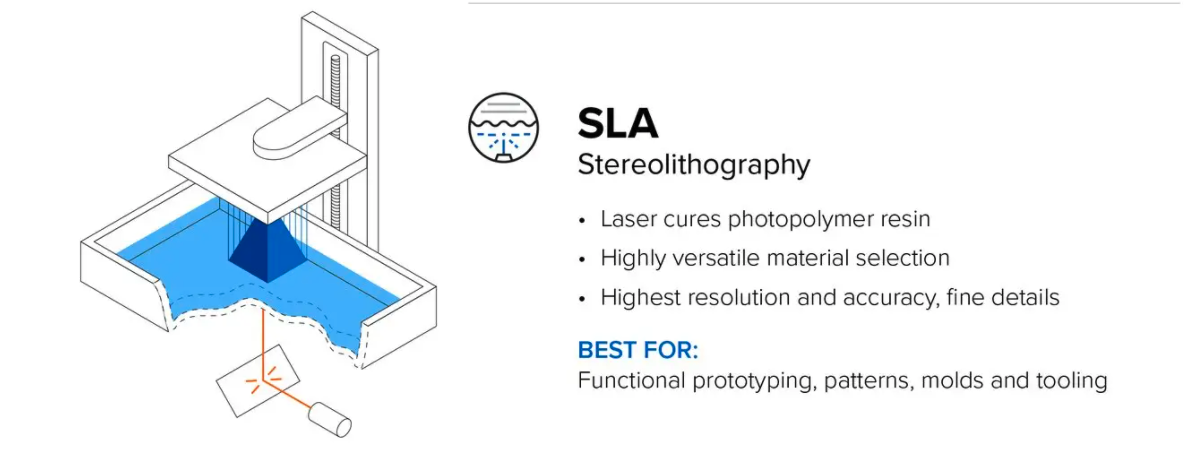
Stereolithography (SLA)
Another common 3D printing technology, SLA, involves using a laser to cure liquid resin within a vat into the 3D object. The curing process is known as photopolymerization, and it is capable of producing objects at very high resolutions.
SLA resin 3D printers have become vastly popular for their ability to make high-accuracy, isotropic, and watertight prototypes and parts in a range of advanced materials with fine features and smooth surface finish. SLA resin formulations offer a wide range of optical, mechanical, and thermal properties to match those of standard, engineering, and industrial thermoplastics.
Traditionally, SLA 3D printers are relatively more expensive than many FDM offerings, but the technique brings some extensive features to the table. SLA 3D printers have the highest resolution and accuracy levels compared to other desktop 3D printers. SLA 3D printed parts are truly industrial-grade and can be used commercially as end-use products.
Pros:
-
SLA produces highly accurate objects at high resolutions, making it an excellent tool for prototyping and developing functional parts.
-
Excellent surface finishes (without lines and other defects that define FDM 3D printing) reduce the number of post-processing activities required.
-
Capable of producing a wide range of objects with great aesthetics and functional components, which is excellent for manufacturing precision devices.
Cons:
-
Finished products must be stored properly as they are sensitive to UV light which, over time, causes the printed part to disintegrate.
-
Materials for 3D printing medical devices are relatively more expensive compared to FDM 3D printers.
-
Although SLA 3D printing is faster than every traditional manufacturing process, it is relatively slower than FDM.
For a comparison of FDM and SLA 3D printing technologies, please review the Formlabs comparison.
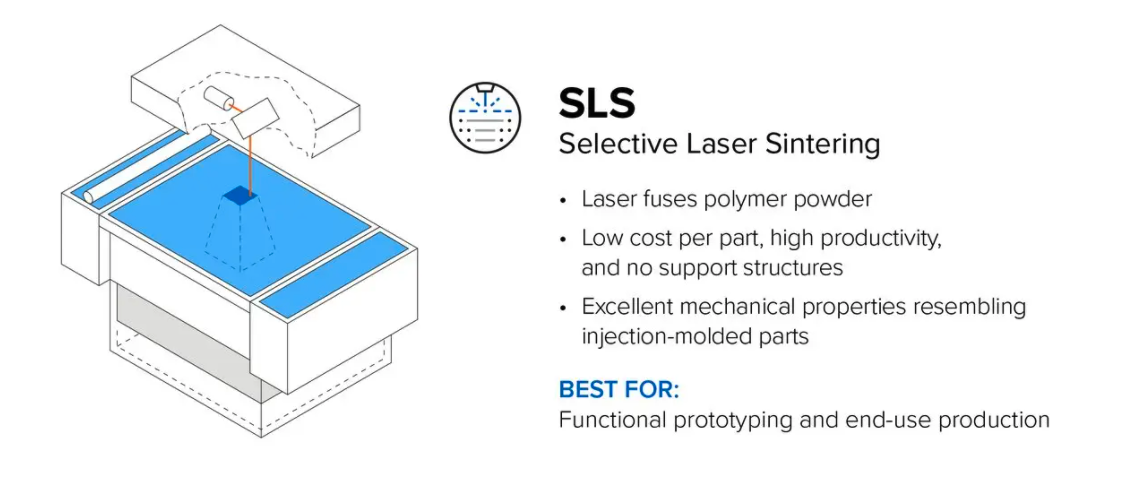
Selective Laser Sintering (SLS)
SLS is known across the industrial sector for its ability to produce high-performing end-use products. The SLS process involves using a powerful laser to fuse small particles of polymer powder into forming the finished part. During the 3D printing process, particles that are not fused support the fused structure, which means there is no need for additional support fixtures, unlike FDM and SLA printing.
The lack of supporting structures and the fusing process makes SLS ideal for developing complex medical device models. Coupled with the materials used, SLS can produce complex parts with a high tensile strength that can be put to practical use.
Pros:
-
SLS produces high-performing parts that are functional and can serve as prototypes and end-use products for commercial use
-
The design freedom that comes with a lack of need for supporting structures makes SLS an excellent technique for 3D printing complex parts with high resolution and accuracy
-
The industrial-grade prints SLS produces require little post-processing, which assists products go-to-market quicker
Cons:
-
The material limitations associated with SLS 3D printing mean manufacturers end up relying on nylon to satisfy the manufacturing process
-
SLS 3D printers are relatively more expensive compared to FDM and SLA 3D printers
Selective Laser Melting (SLM) and Direct Metal Laser Sintering (DMLS)
SLM and DMLS printers work similarly to SLS printers, but instead of fusing polymer powders, they fuse metal powder particles together layer by layer using a laser. SLM and DMLS 3D printers can create strong, accurate, and complex metal products, making this process ideal for aerospace, automotive, and medical applications.
Pros:
-
DMLS is capable of producing high-performing end-use parts from metal
-
DMLS can reproduce complex geometries from metal. Thus, the finished product is strong and durable for commercial use.
Cons:
-
The start-up cost associated with purchasing a DMLS printer is costly compared to other 3D printing technologies.
-
DMLS is equipped with relatively small build volumes, which limits the size of parts that can be 3D printed
For a more in-depth comparison of FDM, SLA, and SLS technologies, please visit the Formlabs guide to 3D Printing Technology Comparison: FDM vs. SLA vs. SLS.
It highlights the workflow for 3D printing of medical devices, 3D printing use cases for medical devices, 3D printing technologies for medical devices, medical-grade 3D printing materials, and regulatory approval for 3D printed medical devices.
Print Materials and Properties
Now that you understand the different types of 3D printing technologies, it is essential to know which materials are compatible with the technology. This knowledge will help inform your decision on which 3D printing technology and material to select for manufacturing your device.
FDM
Plastic extrusion 3D printers work with a range of standard thermoplastic filaments, such as ABS, PLA, and their various blends. The popularity of FDM 3D printing in the hobbyist space has led to an abundance of color options; various experimental plastic filament blends also exist to create parts with wood- or metal-like surfaces.
Engineering materials, such as Nylon, PETG, PA, or TPU, and high-performance thermoplastics like PEEK or PEI are also available. Still, they are often limited to select professional FDM printers that support them.
Properties and comparisons of the most common FDM materials can be seen below.

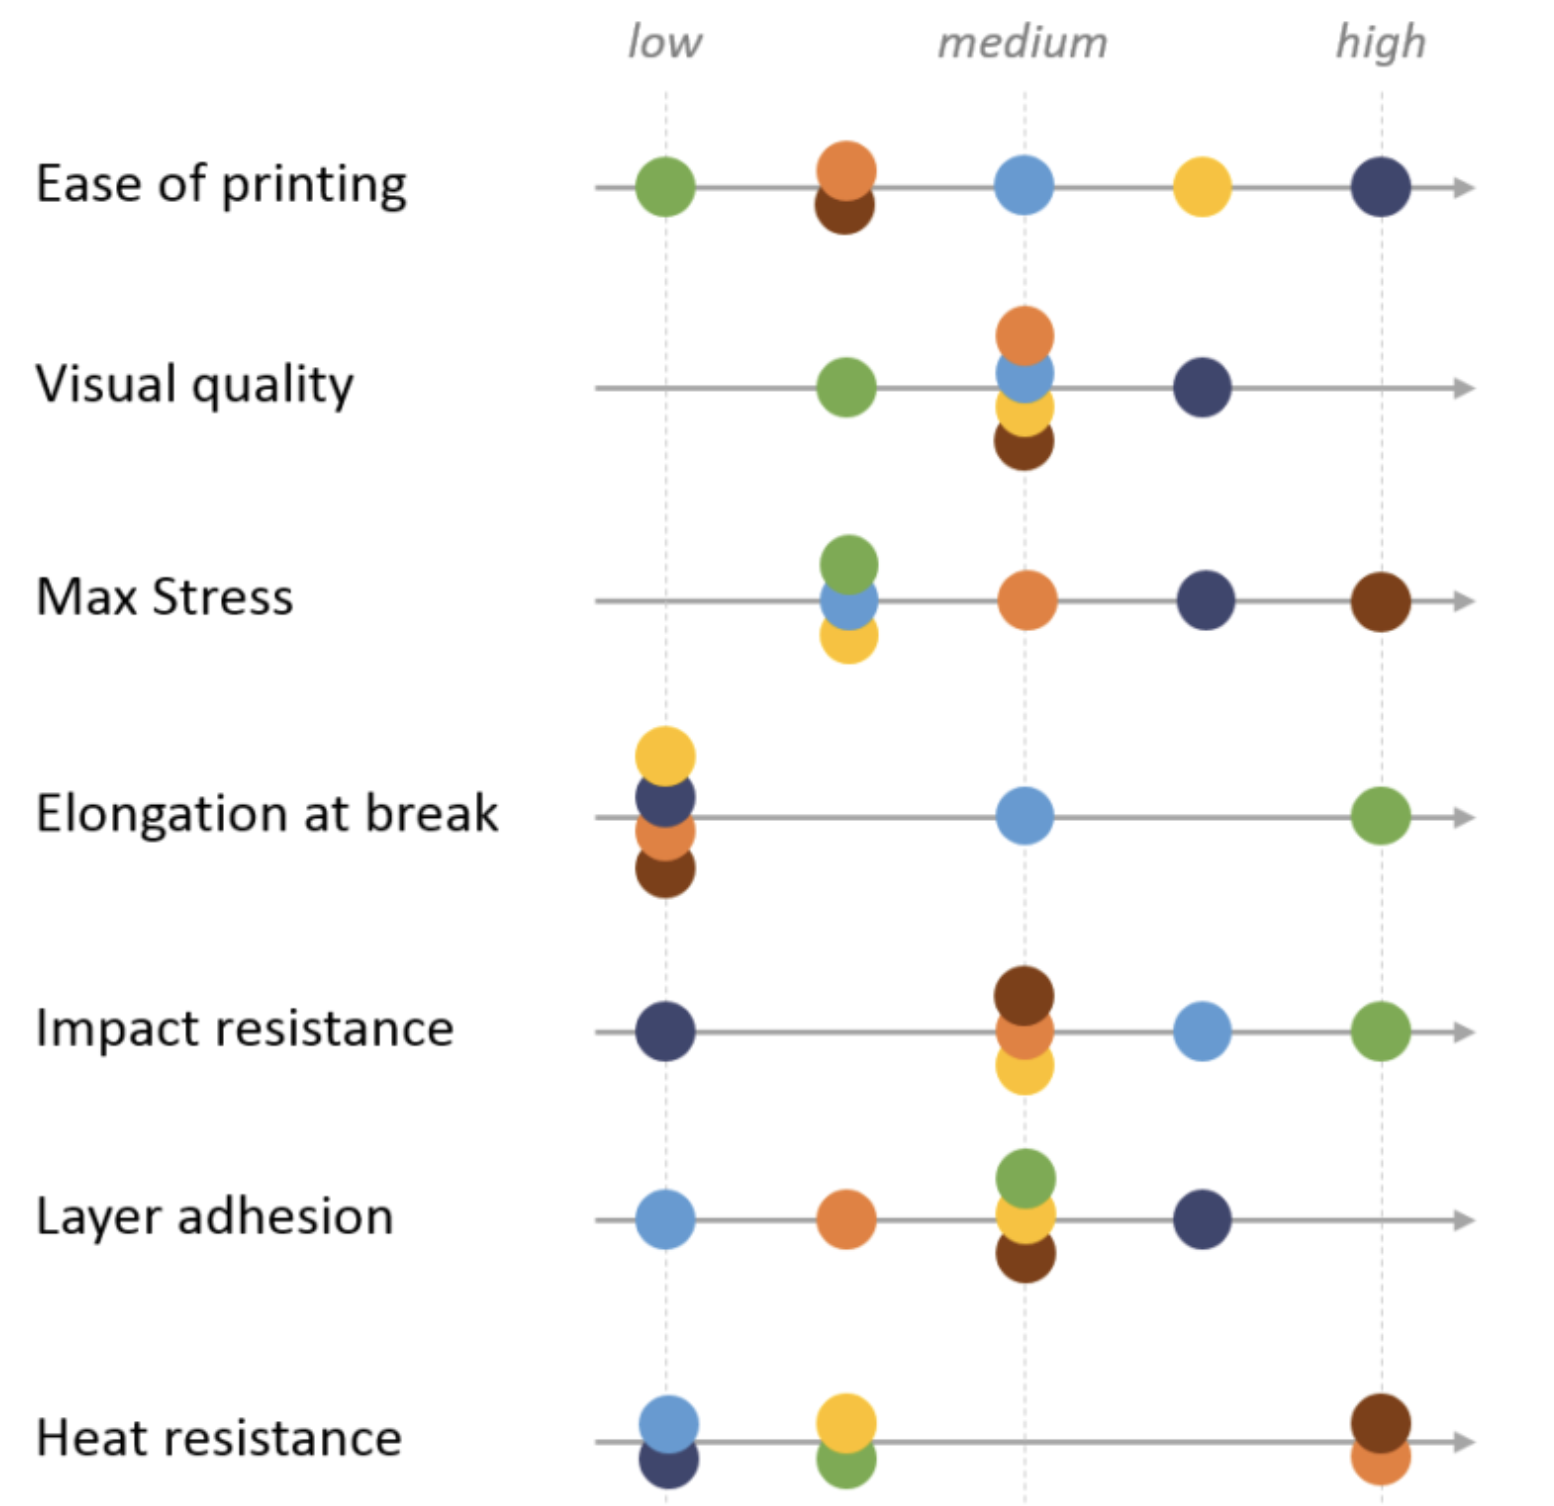
Image: Comparison of material properties of different FDM filaments. Source: Hubs
Please refer to the Hubs FDM 3D printing materials compared guide for more detailed information on each of these materials.
SLA
Before diving into SLA materials, it’s important to know how SLA 3D printing works. Resin is a plastic composed of short carbon chains. It has all of the components of the final plastic but hasn’t been fully polymerized yet. When the resin is exposed to light, the chains are joined together by photoinitiators to create much longer and stiffer chains and thereby solid objects. Due to the layer-by-layer polymerization of SLA printing, on a molecular level, each continuous part printed on an SLA machine is isotropic.
Formlabs resins were designed to simulate a range of injection-molded plastics, covering the full spectrum of properties required to conceptualize, prototype, test, and manufacture successful final parts.
Standard Resin provides high resolution and fine features right out of the printer, making it ideal for rapid prototyping and product development. It has the highest tensile strength of our resins and some of our highest tensile and flexural moduli.
Tough was designed to simulate ABS plastic, with comparable tensile strength and modulus ideal for prototyping functional parts, such as enclosures, snap-fit joints, and assemblies. With a high elongation and impact strength, it’s the resin with the highest toughness.
Durable simulates polypropylene (PP) plastic, with comparable low modulus and high-impact strength for prototyping consumer products, packaging, or low-friction, low-wear moving parts.
High Temp has an HDT of 289 °C @ 0.45 MPa—the highest on the 3D printing materials market. It is ideal for static applications that will undergo higher temperatures, such as injection molding and thermoforming.
Flexible simulates an 80A durometer rubber for simulating soft-touch materials and adding ergonomic features to multi-material assemblies.
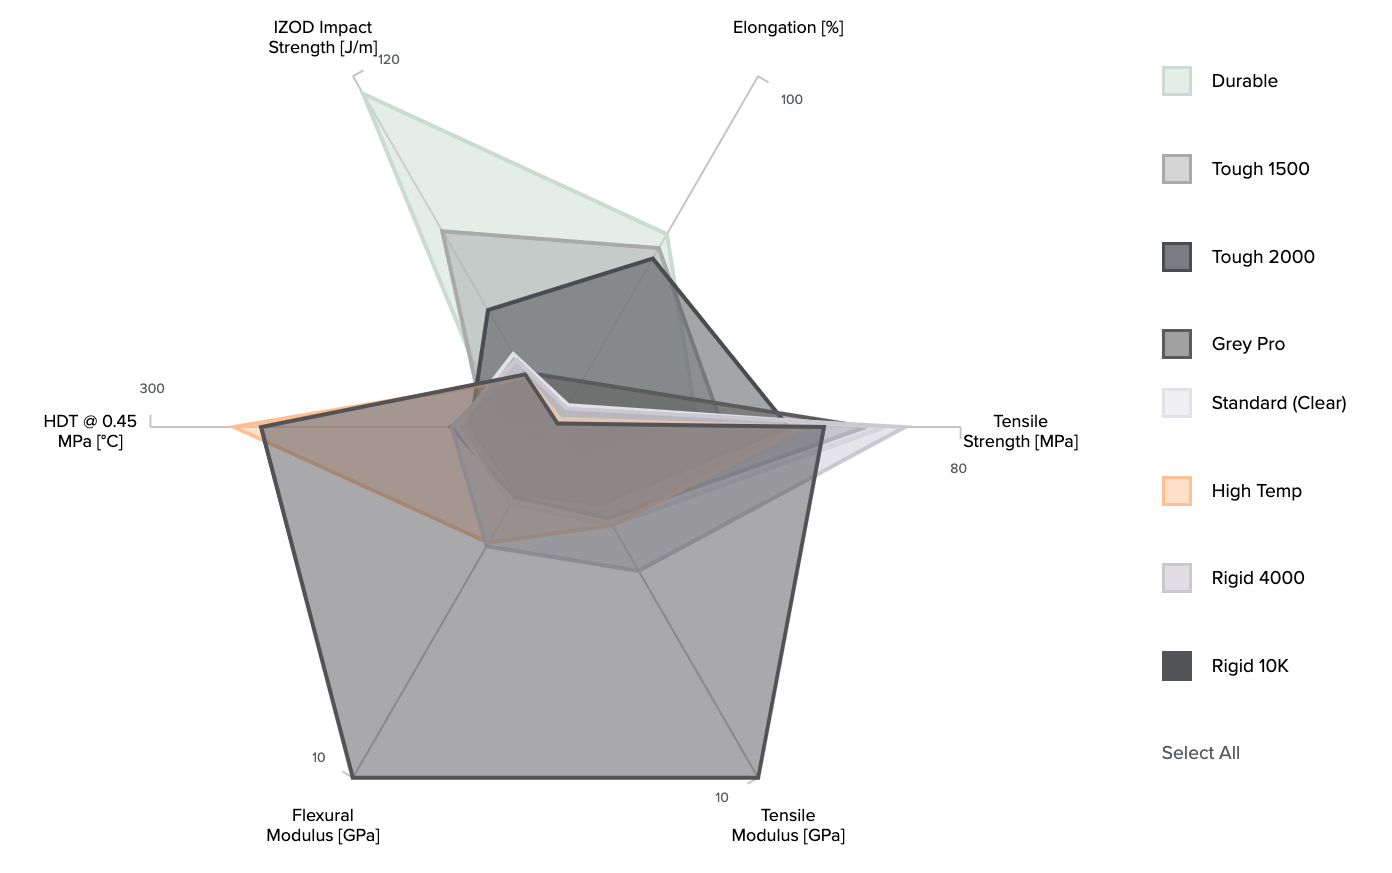
Image: Comparison of material properties of Formlabs SLA resins. For an interactive comparison of Formlabs resins, please visit the Formlabs materials comparison page.
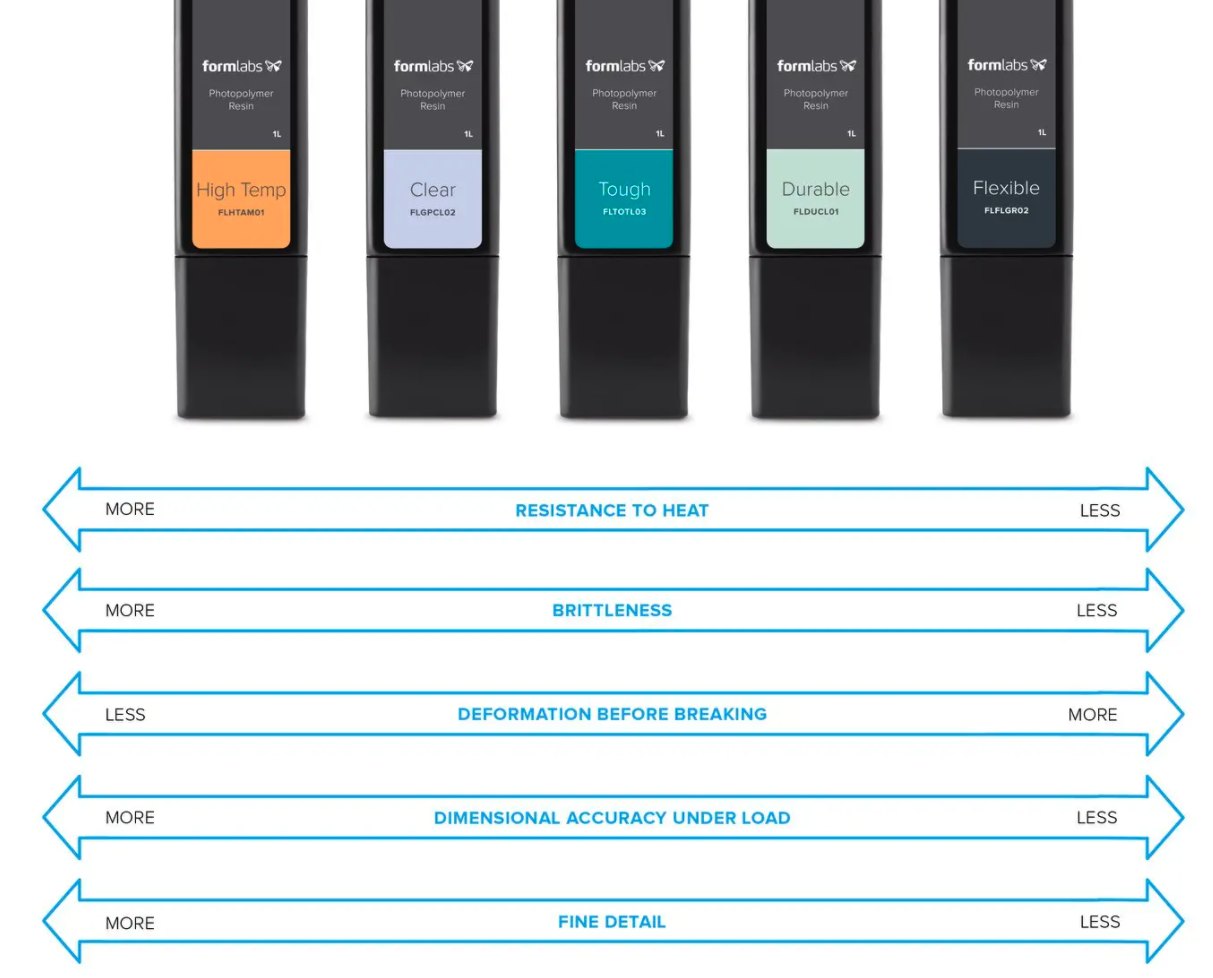
Image: Arrangement of Formlabs resins in order of material properties, including resistance to heat, brittleness, deformation before breaking, dimensional accuracy under load, and fine detail.
For a more detailed guide on each Formlabs resin, their printer compatibility, material properties, and print settings, please review the Formlabs guide to choosing the right material.
For a materials selection guide, please visit the Formlabs material selection resource.
Metal
SLM and DMLS can produce parts from an extensive range of metals, some of the most popular being:
-
Titanium: lightweight and has excellent mechanical characteristics. It is strong, hard, and highly resistant to heat, oxidation, and acid.
-
Stainless steel: high strength, high ductility, and is resistant to corrosion.
-
Aluminum: lightweight, durable, strong, and has good thermal properties.
-
Tool steel: hard, scratch-resistant material that you can use to print end-use tools and other high-strength parts.
-
Nickel alloys: high tensile, creep, and rupture strengths and are heat and corrosion-resistant.
These materials can be used for many industrial applications spanning a variety of industries. Precious metals can also be 3D printed, but their applications are mainly limited to jewelry making (Source: Hubs).
A key strength of metal 3D printing is its compatibility with high-strength materials, such as nickel or cobalt-chrome superalloys that are very difficult to process with traditional manufacturing methods. Using metal 3D printing lets one create a near-net-shape part that can be later post-processed to a very high surface finish (Source: Hubs).
For more information on specific material properties for metal 3D printing, please refer to the Hubs Introduction to metal 3D printing.
Medical-Grade
The most commonly used medical-grade materials can be categorized under biocompatible or non-biocompatible materials. See the following tables for biocompatible and non-biocompatible materials and their characteristics:
|
Biocompatible Materials |
Characteristics |
|
PC-ISO – Polycarbonate thermoplastic used in FDM 3D printing is built for 3D printing items that do not require high-resolution finishes. |
PC-ISO is used in 3D printing surgical guides and other medical devices used for noninvasive patient care. It can be gamma or EtO sterilized. |
|
Nylon PA 12 – Nylon is a thermoplastic generally used with SLS 3D printers. Nylon produces a high-quality finish and durability when used in 3D printing medical devices. |
Nylon can be sterilized using steam, and it is a flexible material which makes it an excellent material for 3D printing medical devices with complex geometries. |
|
ABS-M30i – This is a thermoplastic built for medical device prototyping and end-use part fabrication using an FDM 3D printer. |
ABS-M30i has excellent tensile strength, and it can be gamma or EtO sterilized. |
|
Titanium – The strength and biocompatibility of titanium make it a popular material for developing both end-use medical devices and prototypes. DMLS 3D printers are generally used to 3D print titanium. |
The strength of titanium enables manufacturers to 3D print replacement joints, pacemakers, dental implants, and other durable medical devices. |
|
Cobalt Chrome – Cobalt chrome is a material with high corrosion resistance. This makes it an excellent medical-grade material for developing replacement joints, implants, and teeth. |
Cobalt chrome is a biocompatible material developed for DMLS 3D printers. It is highly durable and produces high-quality industrial-grade devices. |
|
Stainless Steel – This is a durable material that can be sterilized for the 3D printing of medical devices. DMLS 3D printers are used to 3D print stainless steel to produce medical devices with quality finishes. |
Stainless steel is generally used to 3D print supportive devices and surgical tools. 3D printing with stainless steel is relatively less expensive compared to printing with titanium or cobalt chrome. |
|
Silicone – The use of silicone as a 3D printing material is still in its early stages, and only a few 3D printing technologies. |
The flexibility and biocompatibility of silicone are unmatched. Silicone can be used to 3D print end-use medical devices such as respiratory masks, catheters, and medical tubing. |
|
BioMed Amber Resin – This biocompatible resin manufactured by Formlabs is designed to function with SLA 3D printers. It is generally used to 3D print medical devices requiring short-term contact with the human skin. |
BioMed Amber Resin is a rigid material that can be sterilized. Manufacturers can leverage it to 3D print surgical tools and prototypes of medical devices. |
|
BioMed Clear Resin – The clear biocompatible resin option manufactured by Formlabs is a rigid material for developing medical devices that will contact the skin for long durations. |
BioMed Clear Resin is compatible with most sterilization methods, and it is excellent for 3D printing jigs and fixtures, surgical tools, and medical device prototypes. |
|
Non-biocompatible Materials |
Characteristics |
|
ABS 17 – This is a non-biocompatible material developed for printing with FDM 3D printers. ABS 17 is a rigid, durable thermoplastic used for 3D printing surgical models and medical device prototypes. |
ABS is an affordable thermoplastic capable of producing high-quality models. It is one of the most common thermoplastics used with FDM 3D printers. |
|
TPU – Thermoplastic Polyurethane is a durable thermoplastic developed for use with FDM 3D printers. Generally, TPU is used to 3D print surgical models and anatomical parts for clinical studies. |
TPU is a durable thermoplastic that can be painted to reproduce realistic surgical models. |
Evaluate 3D Printer and Material Manufacturers
Material Biocompatibility
Biocompatibility information is required for 510(k) and premarket approval (PMA) submissions in the United States and other regulatory submissions worldwide. It proves whether the device will be compatible with the biological system in which it is intended. Missing or inadequate information can lead to significant delays in bringing the device to market.
Biocompatibility testing requirements should be determined based on the intended use of the device (type, area, and duration of exposure). Determining testing requirements early in the development process will allow ample time to complete testing before submission to regulatory bodies. It should stem from the expected contact between the device and the human body. Three different categories typically define contact:
-
Direct Contact: Comes into physical contact with the patient.
-
Indirect Contact: Comes into physical contact with a fluid, gas, or other material that has direct contact with the patient.
-
No Contact: Does not have direct or indirect contact with the patient and is therefore exempt from biocompatibility requirements.
Formlabs conducts biocompatibility testing based on ISO 10993, ISO 18562, and ISO 7405 standards and publishes the information on relevant resins. As the testing is conducted on standardized printed samples, manufacturers with complex design geometries and other modifications must independently validate the biocompatibility of the finished devices for their intended use.
The below table contains information on types of biocompatibility testing based on bodily contact and duration of contact.
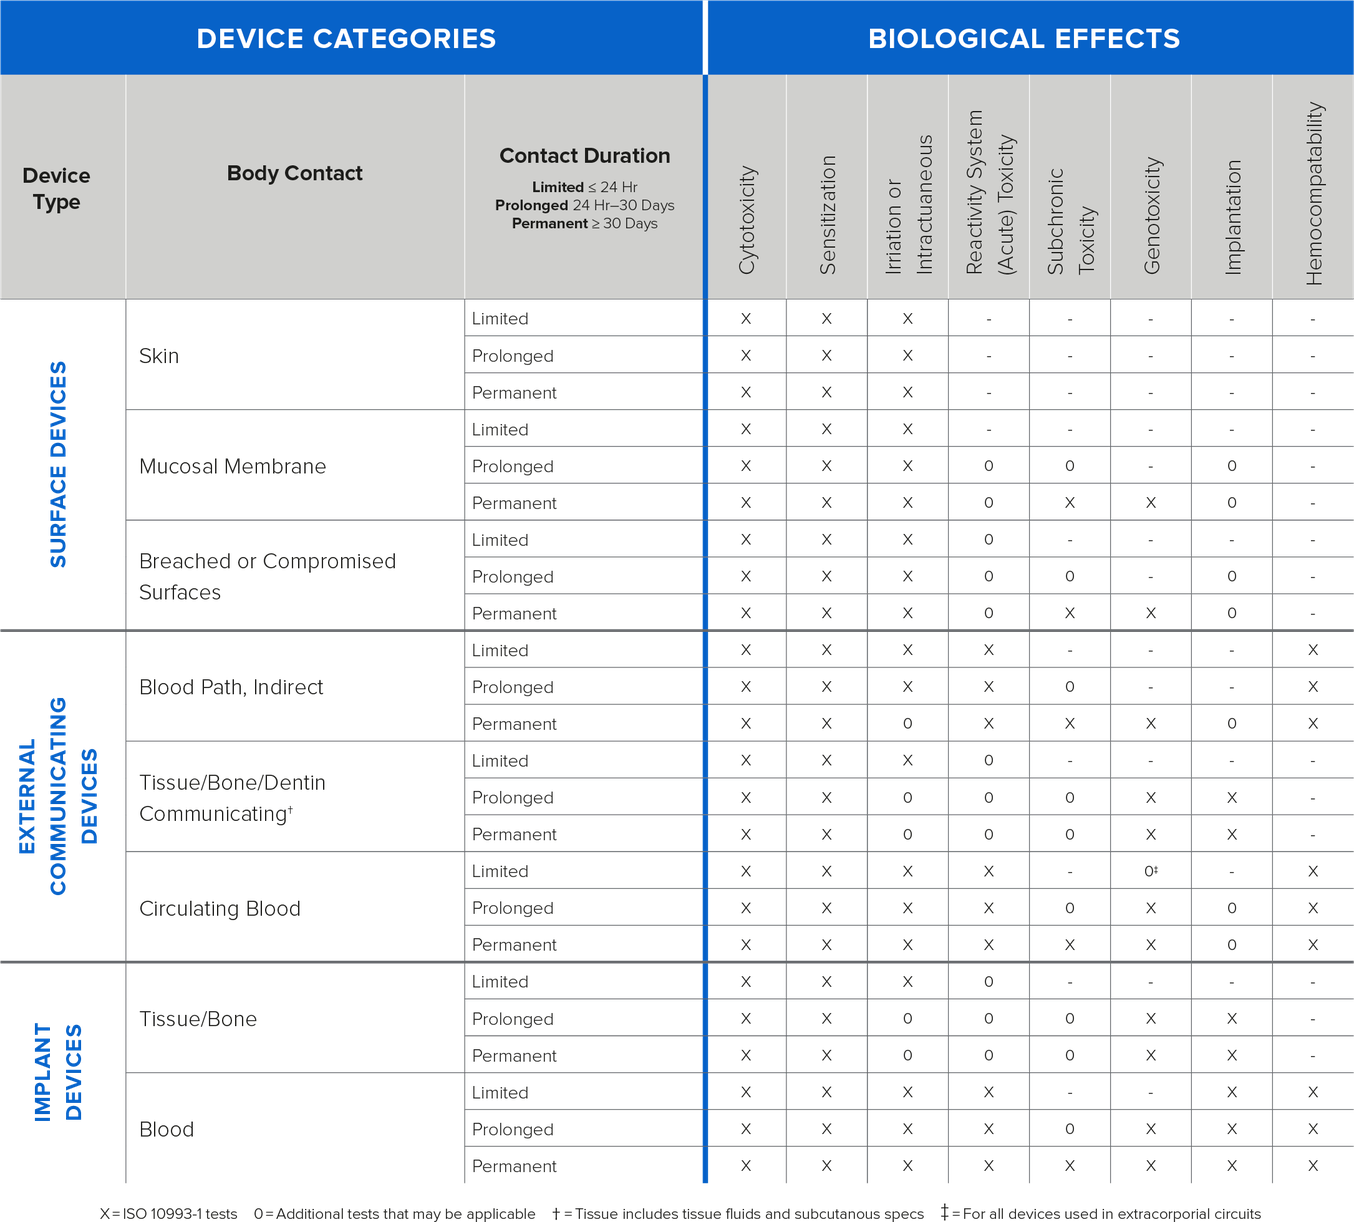
Image: Information on types of testing based on bodily contact and duration
Formlabs Certifications and Standards
Formlabs printers, materials, and associated products comply with various safety and quality standards in different jurisdictions. For statements and documentation related to medical device standards, QMS, environmental standards, HIPAA compliance, FDA Master Files, TSCA, electrical safety, and more, please visit the Formlabs certifications and standards article here.
Product manufacturers using 3D printers for production must ensure that medical devices are accurate, reliable, and safe. This is only facilitated through rigorous workflow validation, testing, and control. Further, recent changes in global regulatory requirements for medical device production brings controlled workflows to the forefront for future-proofing manufacturer capabilities.
If you are evaluating printer manufacturers and are curious about open-mode platforms (i.e., bring your own resin) and controlled-mode systems, please visit this page for more information.
Supplier Selection and Management
The reliability of a supplier can impact the supply chain operations for your medical device and, frankly, your bottom line. For a closer look at how the supplier process works in the medical device industry and the steps manufacturers need to follow when selecting a supplier, please review the “Choosing and Managing Your Medical Device Suppliers” article from Greenlight Guru, which includes details for purchasing processes from FDA 21 CFR §820.50 and ISO 13485:2016, Section 7.4.1.
Supplier selection criteria should include a review of the supplier’s corrective and preventive action (CAPA) procedures, training, testing and validation, cleanliness or sterilization procedures in their facility, labor practices, and standards of current good manufacturing practices.
The supplier and the manufacturer should have a formal agreement outlining the relationship’s expectations and requirements (e.g., quality agreement, supply agreement specification, and material or component specification). At a minimum, this should include preferred test methods, properties required, and any critical process controls for ensuring the production of safe, effective products that are of a consistent standard.
Your supplier agreement should also contain some requirements around communication, especially in the event of deviations or nonconformances. There should also be easily accessible CAPA procedures in place that can be followed to rectify quality events as needed.
Once you select a supplier, your organization will need a robust quality system for managing and storing all of your supplier management records. It’s something you will be audited for; supplier management has always been a frequent source of audit findings and continues to be closely looked at by auditors and inspectors.
Greenlight Guru allows you to keep your approved supplier list, your documented procedures, and evidence of your evaluations easily accessible and always up-to-date to ensure the most optimal supplier management.
Please visit these links for an approved supplier list and a checklist for selecting suppliers and contract manufacturers, provided by Greenlight Guru.
Consider QA/RA Requirements and Constraints
This section will include perspectives and recommendations related to ISO 13485, ISO 10993, ISO 14971, and FDA and MDR considerations.
ISO 13485
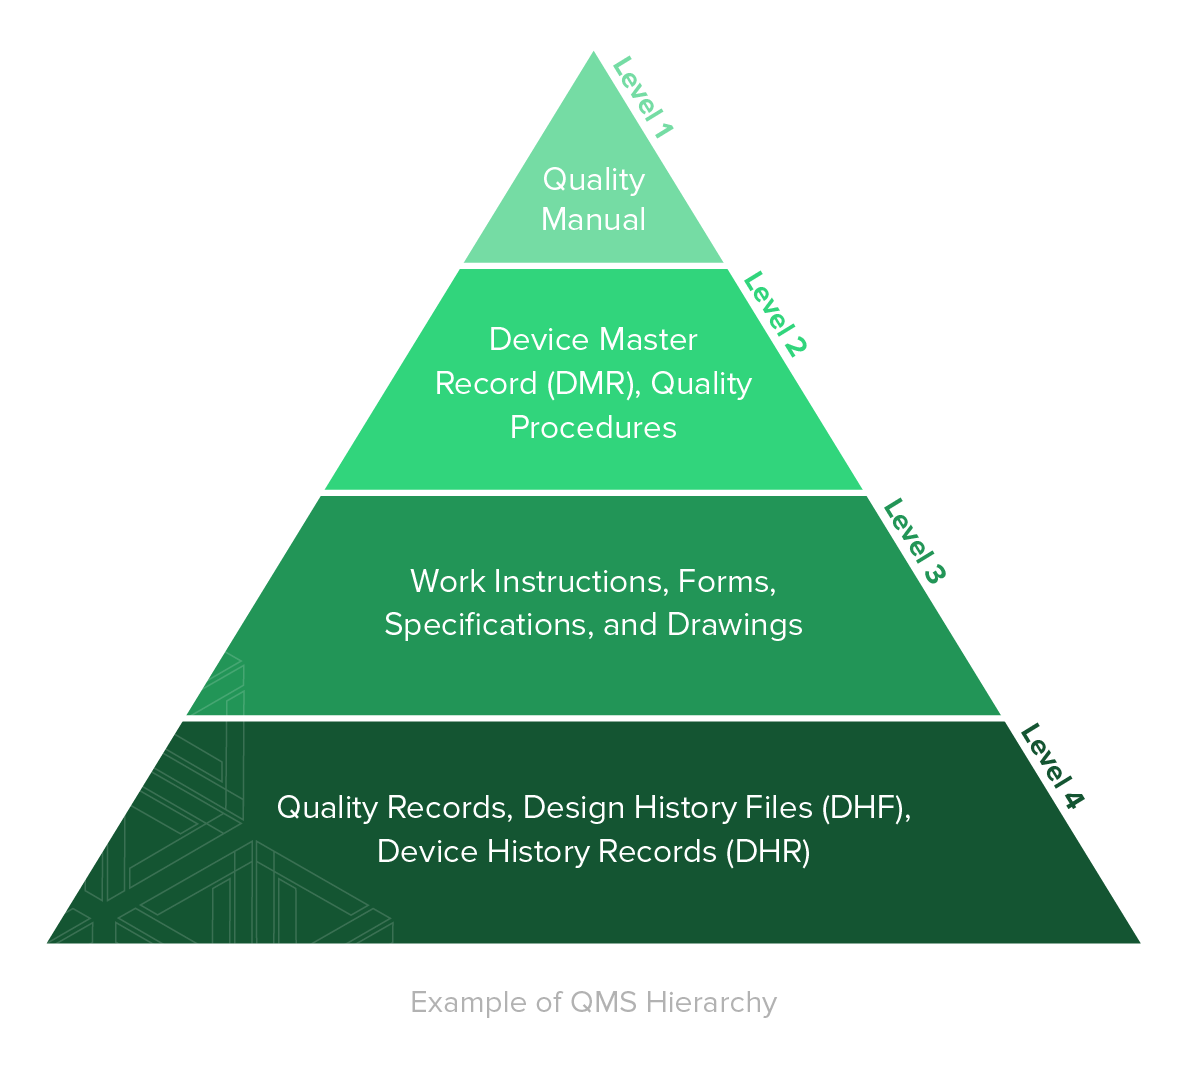
According to the American Society for Quality (ASQ), a quality management system (QMS) is defined as: “A formal system that documents the structure, processes, roles, responsibilities, and procedures required to achieve effective quality management.”
A QMS is comprised of the core set of business policies, procedures, forms, and work instructions, along with their sequence, interactions, and resources required to conduct business within a medical device company. Quality records are documentation that demonstrate the QMS is being executed and followed.
“To align with ISO 13485:2016, contents of your QMS should address the specific, applicable requirements of the international standard, as well as the specific, applicable regulatory requirements of the markets where you plan to manufacture and market medical devices.” - Greenlight Guru
If you are like the majority of the medical device industry, chances are you have a QMS that is a combination of paper-based processes and general-purpose tools, loosely held together by a group of people within your company – usually document control.
Greenlight Guru has an industry-specific software platform architected to support the requirements of ISO 13485:2016 (and other regulatory requirements), where the requirements are addressed automatically with no configuration required.
Please review the Ultimate Guide to ISO 13485 QMS for Medical Devices that will, in large part, follow the major sections and headings of ISO 13485:2016, and provide you specific, actionable steps and best practices you can apply in your medical device company.
Note: Even if you choose to outsource any process(es) that impacts requirements of the standard (for example, contract manufacturing), it is your responsibility to monitor and ensure controls over the outsourced processes. This includes defining roles and responsibilities in documented quality agreements with any outsourcing resources.
ISO 14971
Risk Management, per ISO 14971, is defined as the combination of the probability of occurrence of harm and the severity of that harm. The intent behind Risk Management is to identify, evaluate, analyze, assess, and mitigate potential product issues. Risk Management is a total product life cycle process.
The topic of Risk Management can be daunting and, at times, confusing. Thankfully, ISO 14971 exists and helps provide guidance and direction. ISO 14971 provides a thorough explanation of relevant terms and definitions and defines a risk management process. Greenlight Guru has written the Ultimate Guide to ISO 14971 to align with the latest version of ISO 14971 and provide you additional tips and insights for medical device risk management. Note that the focus of the ultimate guide is strictly medical device product risk management.
Nearly every medical device regulatory agency has placed the topic of Risk Management front and center. In fact, regulatory agencies, including the FDA, are now using risk-based processes throughout their internal processes when reviewing device submissions and conducting inspections and audits.
The U.S. FDA, Health Canada, EU Competent Authority, Australia TGA, and Japan MHLW require you to have a Risk Management process defined and Risk Management documentation for your products. These regulatory agencies also recognize ISO 14971 - Medical devices – Application of Risk Management to Medical Devices.
The current version of ISO 14971 was released in December 2019. This version replaced the previous two versions of the standard utilized by many of you worldwide: ISO 14971:2007 and EN ISO 14971:2012. The EN version was applicable if you were selling medical devices in Europe.
While there is still an EN version of ISO 14971:2019, it is now identical to the regular version of ISO 14971:2019. When selling in Europe, it is essential to know that additional risk requirements apply, outlined in the EU MDR (more on the MDR later in this guide).
ISO 10993
ISO 10993-1 is the medical device industry’s globally recognized standard for the biological evaluation of medical devices, and the protection of humans is its primary goal.
Conducting a biological risk assessment is an essential first step of demonstrating the biocompatibility of your medical device and should be done within the framework of a risk management process.
A biological evaluation should involve a comprehensive risk assessment of your:
-
medical device,
-
material components of the device,
-
manufacturing processes, and
-
clinical use of the device, including anatomical location as well as frequency and duration of exposure.
Following the first phase of the biological evaluation process, knowledge gaps and other significant findings will need to be compiled into a biological evaluation plan (BEP). Your BEP will serve as your initial risk assessment and guide you in addressing known risks. This is typically done by way of biocompatibility testing and further evaluation.
After you’ve identified and documented all known risks in your BEP, the next step is to address those risks by following the requirements from ISO 10993-1 for biological testing.
Biological testing and evaluation are most commonly carried out via:
-
Written evaluation based on scientific literature and any clinical use of the materials.
-
In vivo or in vitro biological tests.
-
Chemistry tests along with toxicological risk assessment.
As mentioned when we discussed medical-grade materials in Chapter 3, biological testing isn’t something to leave until the last minute; it should be considered right from the onset of the product lifecycle and undoubtedly well before you are ready to send in your product submission for regulatory review.
The third step you’ll want to follow when applying the requirements from ISO 10993-1 is to create a biological evaluation report. This final report summarizes the overall biological risk evaluation and assessment, substantiated by data and objective evidence. You also need to include a formal statement confirming the biological risk analysis and risk controls that have been completed.
Formlabs has tested multiple materials for biocompatibility and sterilization compatibility, including medical, dental, and engineering resins, as well as our nylon powders. As of this writing, the list of testing on commercially available resins can be seen below. Reports can be downloaded from this page.
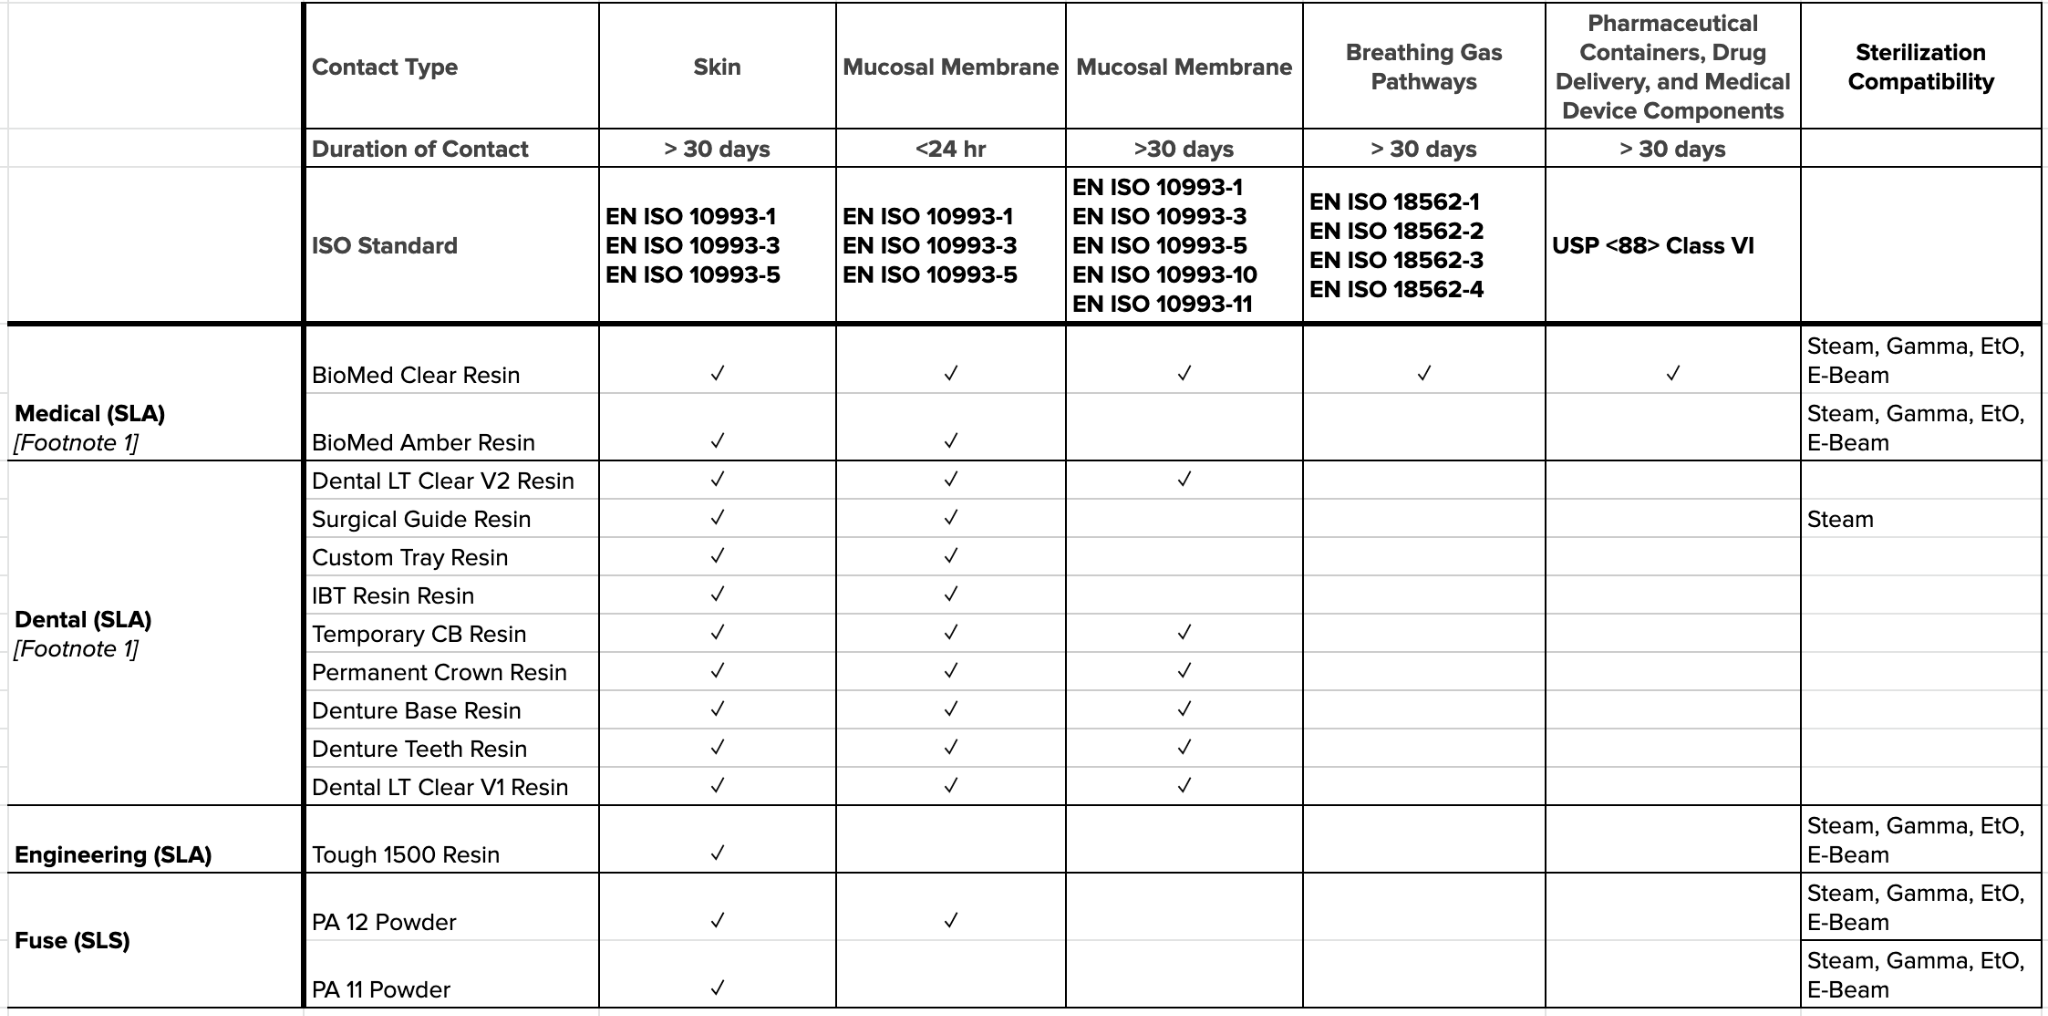
Image: Biocompatibility and sterilization compatibility testing conducted on Formlabs resins. Source: Formlabs Standards and Certifications
Note: Specific sterility assurance levels may be impacted by variables such as manufacturing conditions, part geometries, packaging types, and sterilization modalities.
FDA 21 CFR 820
21 CFR Part 820 is a set of FDA quality system regulations (QSR) that outlines the current good manufacturing practice (CGMP) requirements that medical device manufacturers in the United States must follow regarding their quality system. These CGMP requirements ensure medical device companies establish a QMS that enables the delivery of safe, effective, and compliant products.
As stated by the FDA, 21 CFR Part 820 covers “the design, manufacture, packaging, labeling, storage, installation, and servicing of all finished devices intended for human use,” including the facilities and designs used for those processes.
In Section 820.3, you will see definitions for over 30 different terms used throughout the document that are meant to ensure manufacturers and regulators share a common understanding of the terminology in use. If you’re confused about the meaning of a term, refer to Section 820.3 or lean on trusted, outside resources, such as the Greenlight Guru list of the top medical device terminology.
21 CFR Part 820, though a dense document, lays out medical device QSR in a digestible way for manufacturers to best interpret and apply to their own specific device. The QSR consists of 15 subparts and is structured by way of order, from big picture questions regarding scope to detailed rules about what manufacturers should do and when.
The FDA conducts regular inspections to ensure compliance with its QSR. The FDA uses the Quality System Inspection Technique (QSIT) to evaluate the alignment of internal quality system processes with regulatory requirements. The stakes of compliance are clear.
For more information on 21 CFR Part 820, use this in-depth, easy-to-understand guide from Greenlight Guru that paints a comprehensive picture of the document by explaining the regulations in a way that is easy to understand. Each subpart of the regulation is accompanied by specific advice on how you can comply and common mistakes manufacturers make, so you can make sure to avoid the pitfalls.
In 2018, the FDA announced plans to harmonize 21 CFR Part 820 with ISO 13485:2016, though not much progress has been made on this front. The main difference between the two regulations is that ISO 13485:2016 is a voluntary standard that defines quality system requirements.
21 CFR Part 820 comes from the FDA, a federal agency, meaning that non-compliance can incur punitive measures that range from citations to recalls to fines and, in rare cases, to litigation. While the FDA is local to the United States, much of the world recognizes and follows ISO standards.
FDA Technical Considerations For AM Medical Devices
In December 2017, the Center for Devices and Radiological Health within the US FDA issued a guidance document specific to devices using additive manufacturing (AM) titled Technical Considerations for Additive Manufactured Medical Devices.
Per the FDA: “The purpose of this guidance is to outline technical considerations associated with AM processes, and recommendations for testing and characterization for devices that include at least one additively manufactured component or additively fabricated step.”
Click here to access a full overview table of the various requirements, regulatory considerations, and links to relevant resources from Formlabs and Greenlight Guru in the eBook version of this guide.
FDA 21 CFR 11
21 CFR Part 11 is the FDA's regulations for electronic documentation and electronic signatures. While our focus is on medical device companies and the compliance of their quality systems with this regulation, the rules of 21 CFR Part 11 also apply to companies in pharma, biotech, biologics developers, and other FDA-regulated industries.
21 CFR Part 11 is divided into three sub-parts:
-
The General Provisions section discusses the scope of the regulations and when and how they should be implemented. It also defines some of the key terms used in the regulations.
-
The Electronic Records section sets forth the requirements for the administration of closed and open electronic record-keeping systems, then discusses signature manifestations and requirements for establishing a link between signatures and records.
-
Finally, the Electronic Signatures section is split into three parts: general requirements for electronic signatures, electronic signature components and controls, and controls for identification codes/passwords.
21 CFR Part 11 provides an opportunity for medical device companies to reap the organizational benefits of paperless record-keeping systems. It also helps the FDA ensure that document security and authenticity are adequately maintained when medical device companies use electronic record-keeping systems.
While some may argue that requirements of 21 CFR Part 11 place an additional regulatory burden on these companies, it’s important to note that significant benefits can be derived from implementing these electronic systems. Medical device companies will benefit from embracing the regulations of 21 CFR Part 11 because using an eQMS will catalyze protecting the integrity and confidentiality of their proprietary data.
Since its original publication, 21 CFR Part 11 has generated significant confusion among medical device makers and other industry professionals who may use electronic records. The FDA published a guidance document in August 2003 to clarify the scope and implications of various parts of the regulations.
This document also served to further elucidate the requirements for software validation, audit trails, management of legacy systems, maintenance of copies of records, and record retention. This document provides helpful information about what companies need to comply with its 21 CFR Part 11 requirements.
It is important to remember these kinds of guidance documents themselves are not the law, and medical device companies should always refer directly to 21 CFR Part 11 when assessing their compliance status with FDA regulations.
In this comprehensive guide, Greenlight Guru will take you through each section of 21 CFR Part 11, explaining what the requirements mean and expounding the most critical points for you to know as a medical device company. Use this checklist to ensure you comply with 21 CFR 11.
MDR
The European Medical Devices Regulation (EU MDR) is a legal document that establishes quality regulations with which medical device manufacturers must comply to sell their devices in Europe. On May 25th, 2016, the EU MDR was enacted to govern the quality requirements of medical devices for sale in the European Economic Area (EEA).
The EU MDR replaces both the Medical Devices Directive (93/42/EEC) and the Active Implantable Medical Devices Directive (90/385/EEC) and allows medical device manufacturers a three-year transition period to establish compliance with the new requirements (ending in 2020 for medical devices and 2022 for in-vitro medical devices.
One of the objectives for revising the EU MDR was to expand post-market surveillance of medical devices in Europe. To add an additional layer of safety for consumers, the EU MDR also mandates unique device identification (UDI) for all medical devices sold in the continent, ensuring that authorities can efficiently trace devices through the supply chains and initiate prompt and targeted recalls when required.
The EU MDR has also formalized the expectations that your QMS, documents, records, product information, risk, etc., are interconnected. Said another way, all of the documentation and records of your QMS and products need to be a seamless system of data and information.
One of the first things to know about the MDR is that the regulation is four times longer than the old MDD. There is an increased emphasis on risk and safety and a considerably expanded scope for “regulated devices.” Medical purpose devices and active implantable medical devices (AIMD) are now included in the MDR. Previously, certain devices and accessories were not within the scope of the regulation.
We highly recommend that you begin working with your Notified Body now to figure out what applies to you and how your devices will be impacted. It is up to you to know the timelines for your devices and what you will need to do to ensure they are compliant with the MDR.
The EU model wants to move more toward a whole lifecycle focus, so there is an emphasis on continuously updating your risk, your technical file, and ongoing evaluation of your devices. This expectation is fundamental for medical device companies to properly manage their devices throughout the entire product lifecycle–from design and development, through design transfer, through post-market surveillance, through product and process changes.
How are you going to ensure all of these aspects are connected and tied together? Greenlight Guru’s eQMS is built to do just this.
Resource Management/Supply Chain
MDR identifies distributors, importers, and EU-authorized representatives as Economic Operators, each with specific responsibilities regarding verification of compliance, cooperation in complaint
handling and field safety corrective actions, and cooperating with manufacturers and Competent Authorities in device traceability. Some distributors and importers may never have had a quality system before. Under this regulation, they will need to develop one.
UDI and Labeling
Those registered under the FDA will be familiar with UDI codes, but this is a new requirement under the MDR and is addressed in Article 27. You need to develop an SOP for UDI and labeling that:
-
Defines storage of the UDI at each level (electronically is preferred)
-
Details the process for importing UDI information into EUDAMED. You also need to include monitoring of EUDAMED. The process goes live in May 2022.
You are also required to keep an up-to-date list of all UDIs.
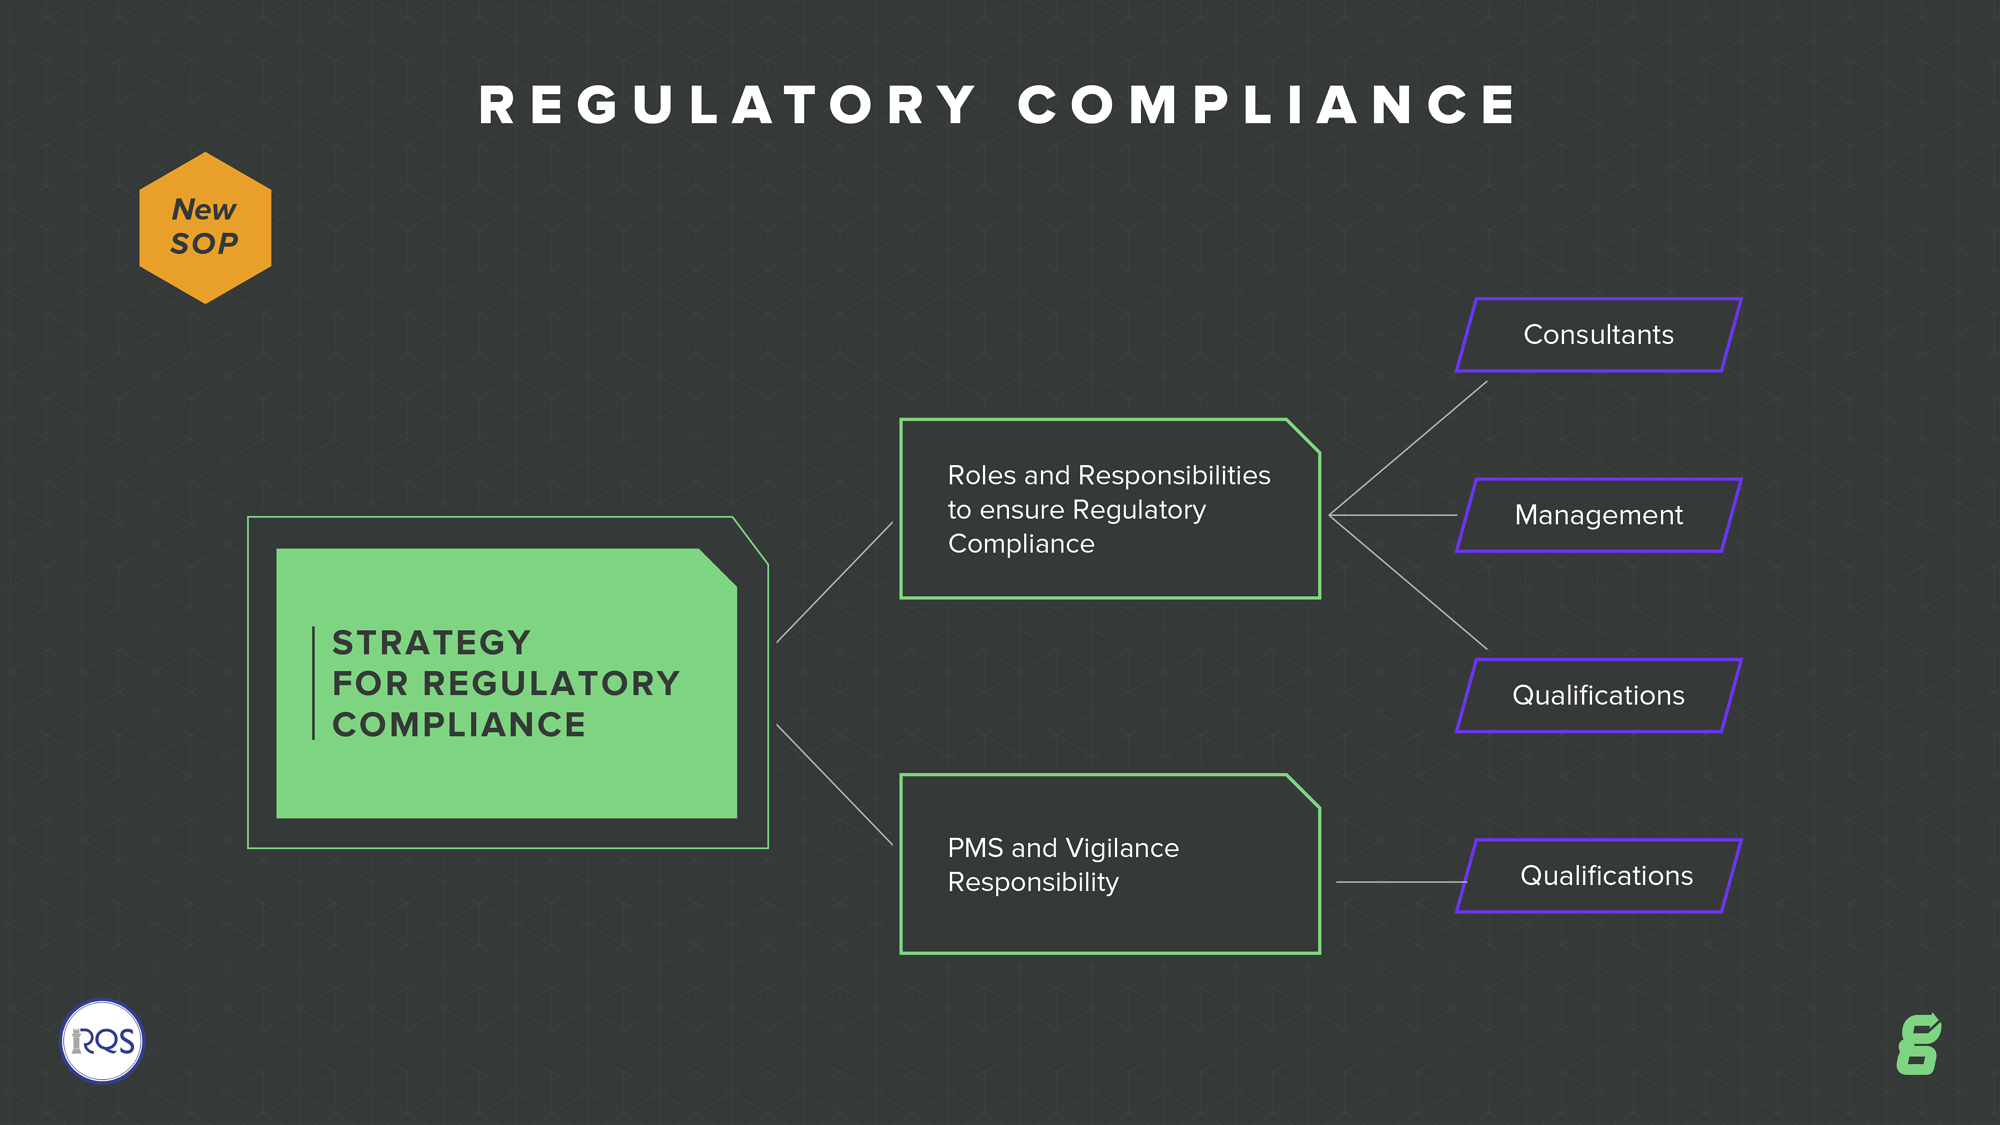
Regulatory Compliance
All companies should have within their quality system a defined strategy for regulatory compliance. Doing so might result in defining a new SOP. The EU MDR outlines the requirements of the “person responsible for regulatory compliance.” They must have a relevant degree or sufficient work experience to understand and meet the requirements of the standard. It also outlines that if you are a small company, you don’t have to have this person on staff, but you should consult with a company that has regulatory compliance expertise.
GENERAL SAFETY AND PERFORMANCE REQUIREMENTS
See below for some of the critical requirements of the MDR that the manufacturer must fulfill:
Risk management
There is a broadening of the scope of risk analysis, even though you may have met this under ISO 13485:2016 and ISO 14971:2019. You need a risk management plan for each device, tighter risk analysis, risk controls, post-market risk procedures, and training on device safety as needed.
Labeling
There are additional requirements for labeling, such as the need to provide a GSPR checklist. You are also required to provide information on warnings, precautions, or contraindications on the labeling. For class III devices and implantables, a summary of safety and clinical performance is required on the labeling.
QMS Preparation
While QMS considerations are detailed in Chapter 7, here are a few summarized points to help you prepare your QMS for the EU MDR:
-
Understand the key changes in the MDR and conduct a GAP analysis to understand where you are now and where you need to be to comply.
-
Compliance with ISO 13485:2016 QMS requirements will help you to comply with MDR, as they are similar. “Guidance on the relationship between EN ISO 13485: 2016 (Medical devices - Quality management systems - Requirements for regulatory purposes) and European Medical Devices Regulation and In Vitro Diagnostic Medical Devices Regulation” is a helpful document to compare ISO 13485:2016 with the MDR.
-
You need a very practical system for risk management, and it needs to be focused across the entire lifecycle of the device. Risk is a key focus in the changes.
-
Ensure that everyone considered an “economic operator” for your device (suppliers, distributors, importers, etc.) understands the changes and has a plan for compliance.
-
You need a robust system for documenting your QMS. An eQMS is preferable, allowing you to keep it updated and transparent easily. Greenlight Guru's software platform is an excellent solution for this, including a built-in system for the technical documentation requirements.
For an MDR + IVDR gap analysis toolkit, please try these tools intended to help manufacturers begin the transition to Europe's Medical Device Regulation (MDR) and In Vitro Diagnostic Regulation (IVDR) by understanding and assessing which changes must be made to comply with Chapter I requirements.
As you assess and prepare for the EU MDR (and all of the other global medical device regulation changes), more and more emphasis will be placed on your QMS. Greenlight Guru's eQMS Software is exclusively focused on the medical device industry, and my top responsibility to you is to ensure that this solution keeps you ahead of these changes.
Formlabs certifies that its Class I medical devices manufactured before May 25th, 2021, and expiring no later than May 25th, 2023, can be used and sold in accordance with the EU MDR. Formlabs also certifies that its Class IIa medical devices can be used and sold in accordance with the EU MDR. For information on Formlabs compliance with the MDR, visit the Formlabs MDR FAQ page.
MHRA
If you intend to place a medical device on the United Kingdom (UK) marketplace, then changes in the regulatory landscape resulting from Brexit are relevant to you. The Medicines and Healthcare products Regulatory Agency (MHRA) is an executive authority in the UK responsible for governing its healthcare products, such as medicines, medical devices, and blood components for transfusion.
MHRA has recently published new guidance on rules that will govern the regulation of medical devices. There is a grace period for some changes, but others are in effect immediately.
Note that the new MDR and IVDR are exclusive to the EU marketplace and do not automatically apply in the UK. One exception is Northern Ireland, which maintains a special status. Medical devices entering Northern Ireland must register with MHRA UK but follow the EU market requirements of either MDR and IVDR. A CE Mark will remain a requirement for market entry in this region.
The UKCA mark will only be recognized in Great Britain. Existing UK Notified Bodies have become “Approved Bodies” and can conduct the UKCA mark process, and they can no longer issue the CE Mark. Additionally, the UKCA mark is not recognized in the EU, EEA, or Northern Ireland markets.
Click here for more information on how the MHRA is regulating medical devices in the UK post-Brexit.
Establish a QMS
A QMS is comprised of the core set of business policies, procedures, forms, and work instructions, along with their sequence, interactions, and resources required to conduct business within a medical device company. Quality records are documentation that demonstrate the QMS is being executed and followed and describe how your company addresses medical device regulations.
The FDA defines the rules in 21 CFR Part 820. And if you plan to go to market in the U.S., these regulations are required. Outside the U.S., Europe requires a quality system to be established to meet the medical device regulations (and/or IVD regulations). Many medical device companies implement a quality system certified to ISO 13485:2016 to satisfy EU needs.
Greenlight Guru encourages “bootstrapping a QMS” for early-stage startups. Early on, you don’t need to spend too much time implementing a robust quality system. You need to be focused on product development. And as you get closer and closer to going to market, there are software tools, like Greenlight Guru and others, you can use to gradually implement more and more of a QMS.
Implementing Your QMS
If you are going through medical device product development, there are at least four parts of a quality system that you need to put in place:
Refer to regulatory requirements and resources in Chapter 5 for information on bullets 2-4. Read below for more information on Design Controls and additional QMS considerations. For more information on CAPA processes and requirements, please refer to Greenlight Guru’s Ultimate Guide to Corrective and Preventive Action for Medical Devices.
Visit Greenlight Guru’s website for design control, document management, risk management, and other regulatory solutions.
Design Controls
You must design and develop a safe medical device. The FDA, European Commission, Health Canada, and all other regulatory bodies worldwide will want some assurance that your medical device is safe before you bring the product to market. And this is the essence of Design Controls: proof that you have designed a safe product that meets user needs and requirements.
Technically speaking, “Design Controls” is an FDA term and defined in 21 CFR §820.30. In ISO 13485 speak, the terminology and intent are similar and covered in section 7.3 Design and Development.
The table below compares the FDA clauses for Design Controls to ISO 13485:2016 clauses regarding Design & Development.
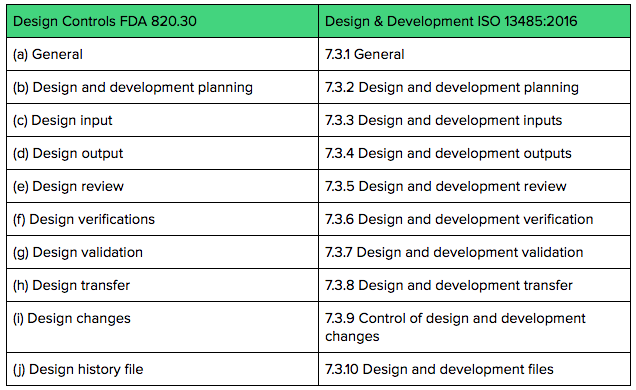
Both FDA Design Controls regulations and ISO 13485 Design & Development requirements expect you to keep documentation and records throughout the product development process.
The Design History File (DHF) is a great place to keep all of your Design Control’s “evidence.”
For more information on design controls, visit Greenlight Guru’s Ultimate Guide to Design Controls.
SOPs
It is essential to consider SOPs in virtually all aspects of your QMS. An SOP is a set of mid-to-high level written instructions that documents how an organization or department should achieve specific tasks. SOPs may be developed for routine and regular procedures, such as document control, and should also be developed for essential tasks that aren’t so regular, like CAPAs. As a medical device company, your SOPs form an integral part of an effective quality management system.
All SOPs should do the following:
-
Document how activities are to be performed to maintain consistency and to support quality practices.
-
Describe the analytical process validation and qualification processes and processes for maintaining, calibrating, and using the equipment.
-
Maintain quality control and assurance processes, ensuring compliance with regulations.
Medical device companies must adhere to many requirements to maintain regulatory compliance, and those must be clearly documented. To name just a few, separate SOPs are required for each of the following:
-
Document controls
-
Manufacturing
-
Transporting and storing products
-
Supplier management
-
Reporting problems or failures
-
Initiating and conducting CAPA
-
Risk management
-
Design controls
-
Training
-
Clinical evaluation
For more information on SOPs, visit this guide from Greenlight Guru.
Prepare For Process Validation
For verification and validation, it may be most helpful to start with definitions and regulatory requirements.
Verification and Validation
According to an FDA QSR Process Validation document:
-
Per 21 CFR §820.3 (aa): Verification means confirmation by examination and provision of objective evidence that specified requirements have been fulfilled.
-
Per 21 CFR §820.3 (z), Validation means confirmation by examination and provision of objective evidence that the particular requirements for a specific intended use can be consistently fulfilled.
-
Per 21 CFR §820.3 (z)(1), Process Validation means establishing by objective evidence that a process consistently produces a result or product meeting its predetermined specifications.
To further distinguish validation from verification, the first sentence of 21 CFR §820.75 states:
“Where the results of a process cannot be fully verified by subsequent inspection and test, the process shall be validated with a high degree of assurance and approved according to established procedures.”
As part of quality system process validation, manufacturers should consider personnel, equipment location, maintenance, and other variables.

Process Validation Applied to Additive Manufacturing
According to ASME, which published Process Verification & Validation for Medical Devices Using Additive Manufacturing, process verification and validation are two important and commonly misunderstood activities in developing medical devices. The ASME document explains the differences between these two activities and how they apply to additive manufacturing (AM) for medical devices.
In virtually all medical devices, there are certain features or characteristics of the device, called CTQs (critical-to-quality), that are important for the device to function correctly; these features are often used to create the product specifications. Some common examples of CTQs are:
-
Dimensions and tolerances
-
Clearance or interference fit between mating parts
-
Raw material mechanical properties such as tensile strength, hardness, density
-
Raw material chemical composition
-
Part weight
-
Strength of a packaging seal
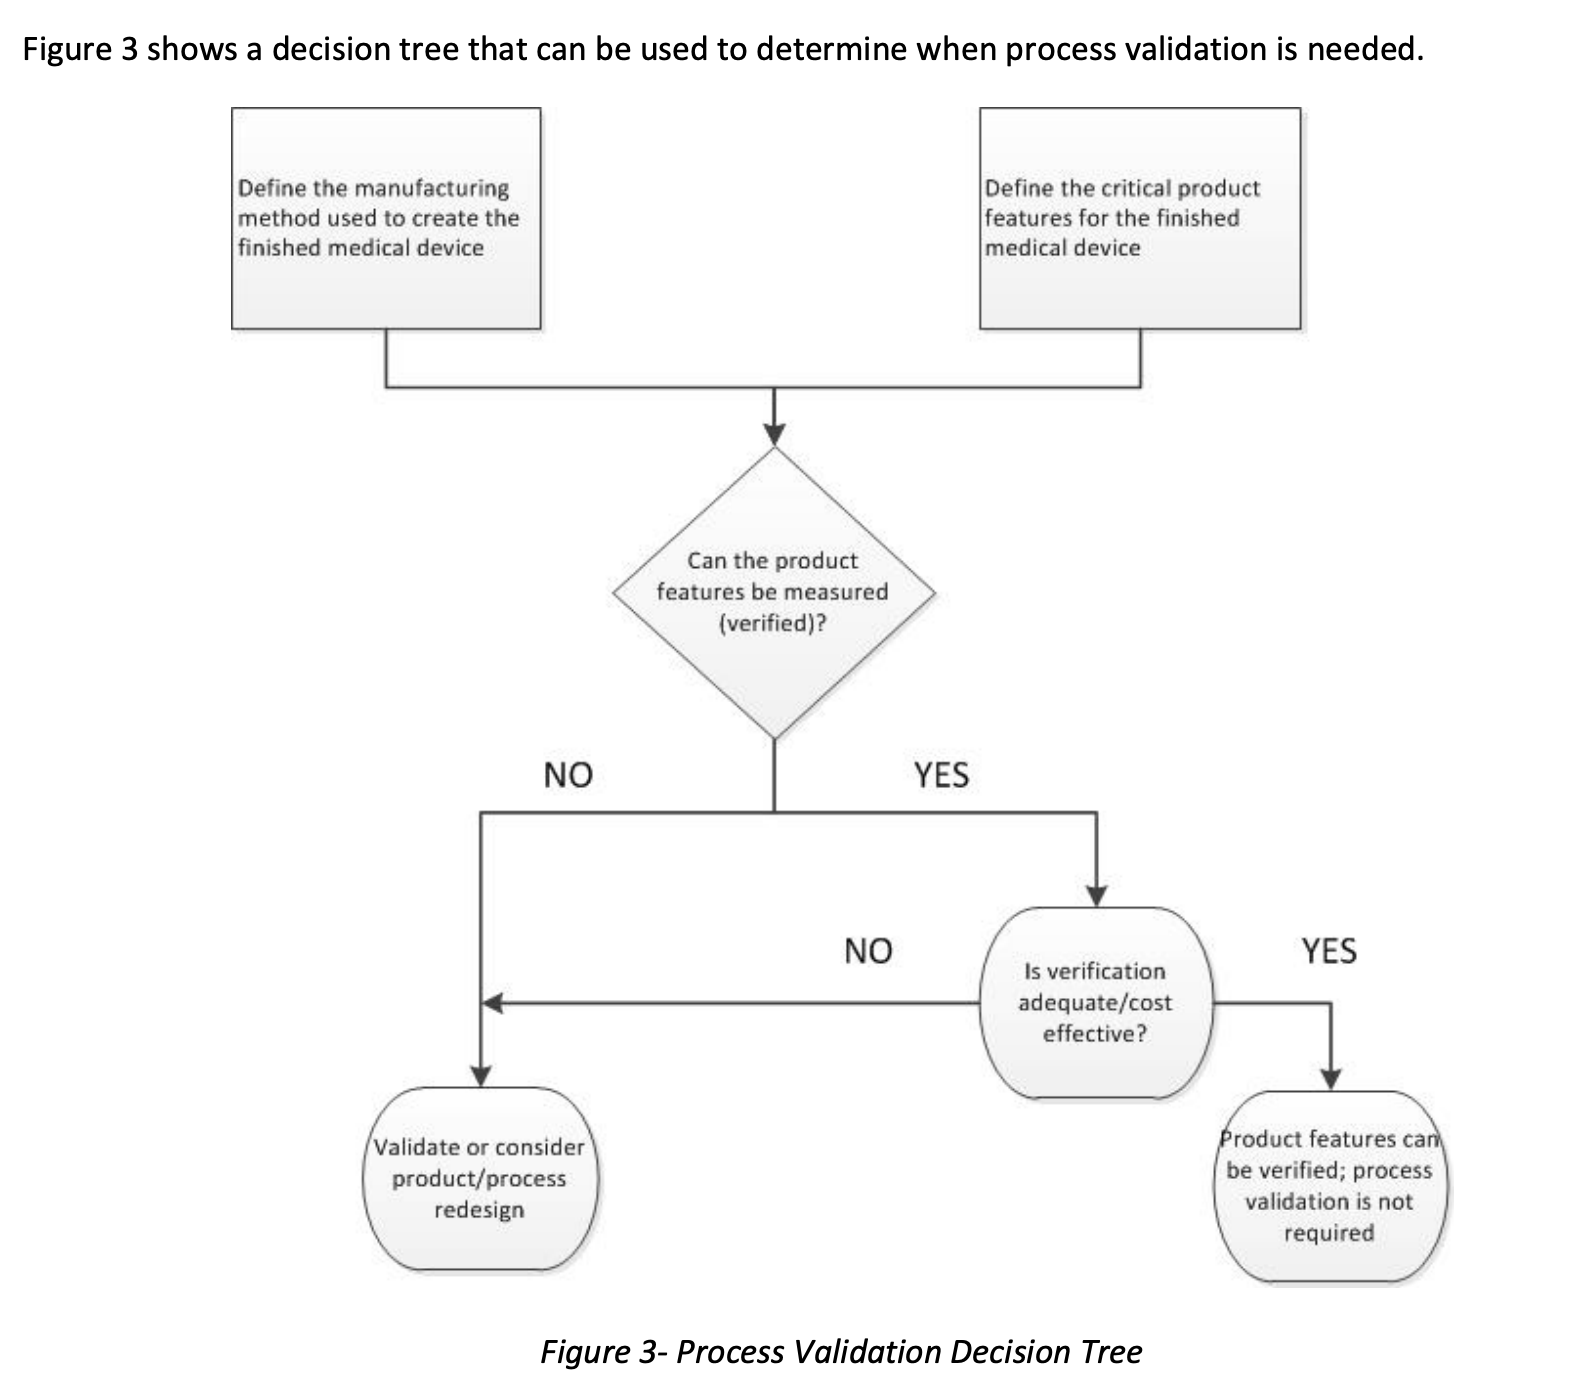
To demonstrate that the manufactured medical device meets the design specifications, documented proof must exist to demonstrate that the CTQs have been met. Typically, there are two ways to do this: process verification or process validation.
If a CTQ can be measured, it is said that the CTQ can be verified. For example, the length of a bone screw can be verified by measuring it with calipers, and the weight of an instrument can be verified by weighing it on a scale.
On the other hand, validation is used when the test method to check the CTQ would alter or destroy the device. For example, validation would be considered for chemical composition, static tensile properties, macroscopic density, and porosity. Regulation also states that all automated systems must be validated for their intended use even if you verify.
When thinking about validation for AM, it’s easy to become focused on the printing step. However, several activities usually happen upstream of the printing process and several activities happen downstream from the printing process. All of these steps should be defined to understand the entire manufacturing process fully. Additionally, the inputs to and the outputs from each step in the manufacturing process should be identified.
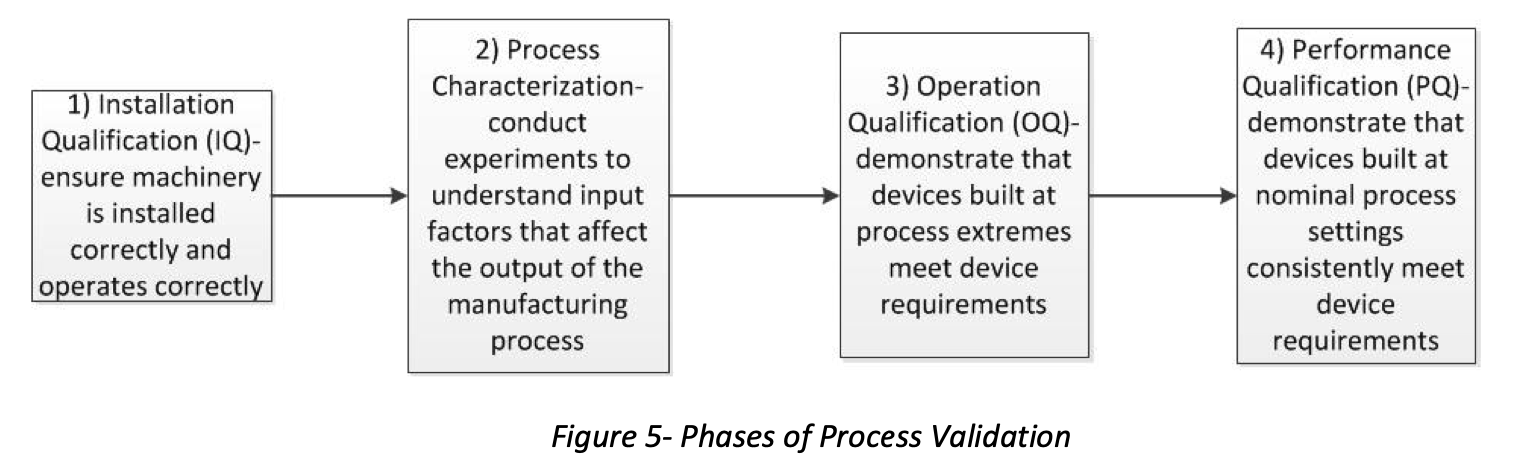
IQ/OQ/PQ
Installation Qualification (IQ)
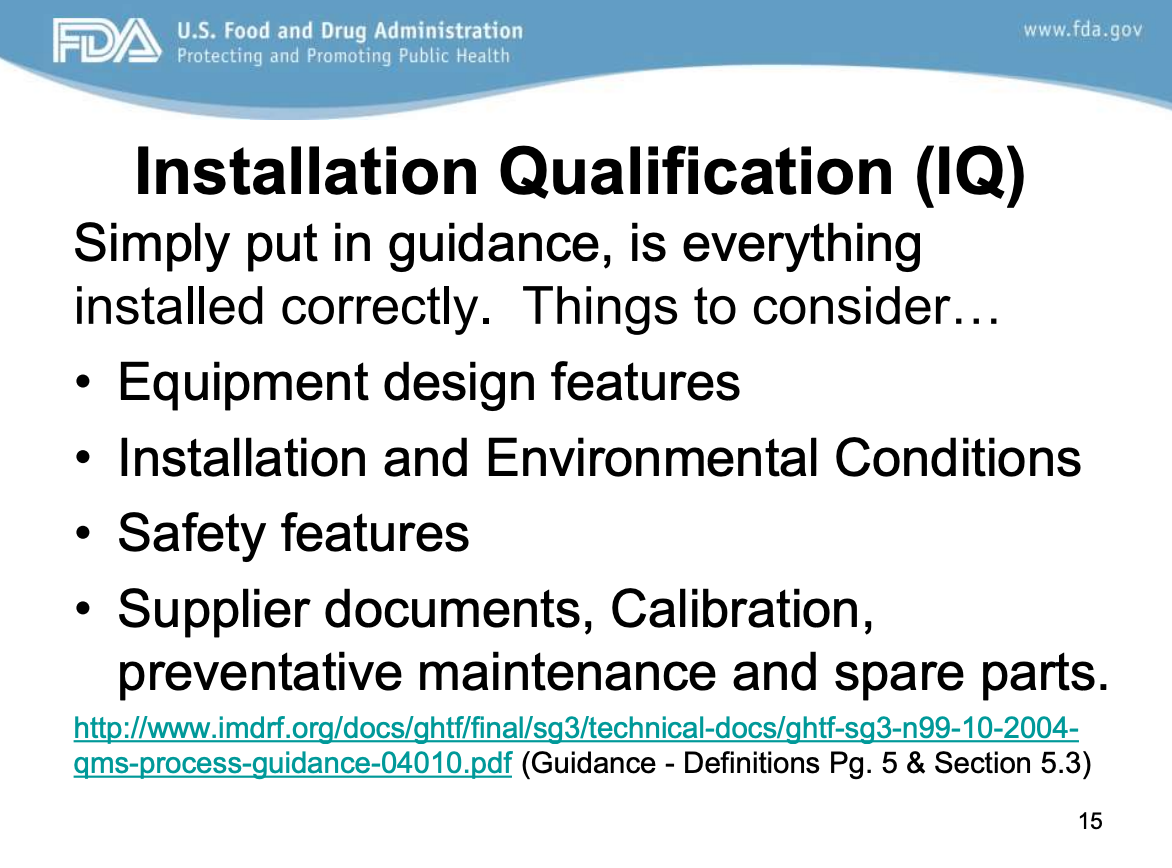
According to the American Society of Mechanical Engineers (ASME), IQ is a formal activity to demonstrate that all manufacturing equipment used to produce a medical device has been installed correctly and operates per the manufacturer’s specifications.
Before installing the equipment, an IQ protocol is written to describe the equipment to be installed, the method of installation, and the acceptance criteria used to demonstrate that the installation was successful.
An IQ report must also be generated to document the successful installation of the equipment. Things to consider include equipment design features, installation and environmental conditions, safety features, supplier documents, calibration, preventative maintenance, and spare parts (FDA).
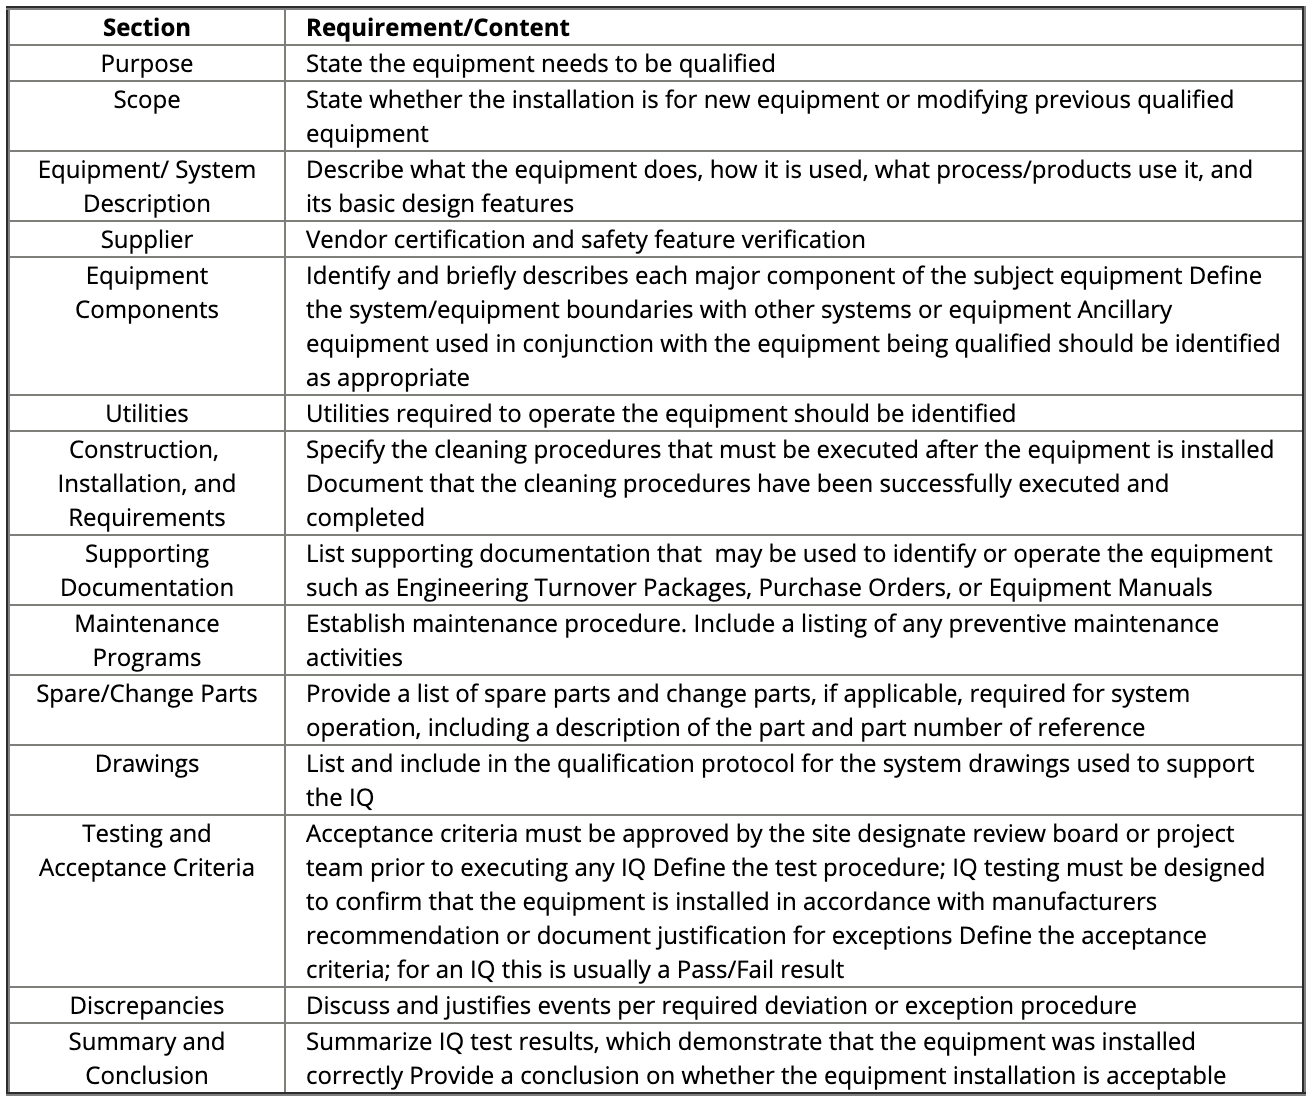
Figure: IQ Sections and Requirements. Source and ©: IVT Network
Process Characterization
During process characterization, the variables listed in the table below should be tested with test coupons to determine a “worst-case” build file used in OQ and PQ. For example, during process characterization, it may be found that smaller coupons are weaker than larger coupons or that coupons printed in a horizontal orientation are weaker than coupons printed in a vertical orientation.
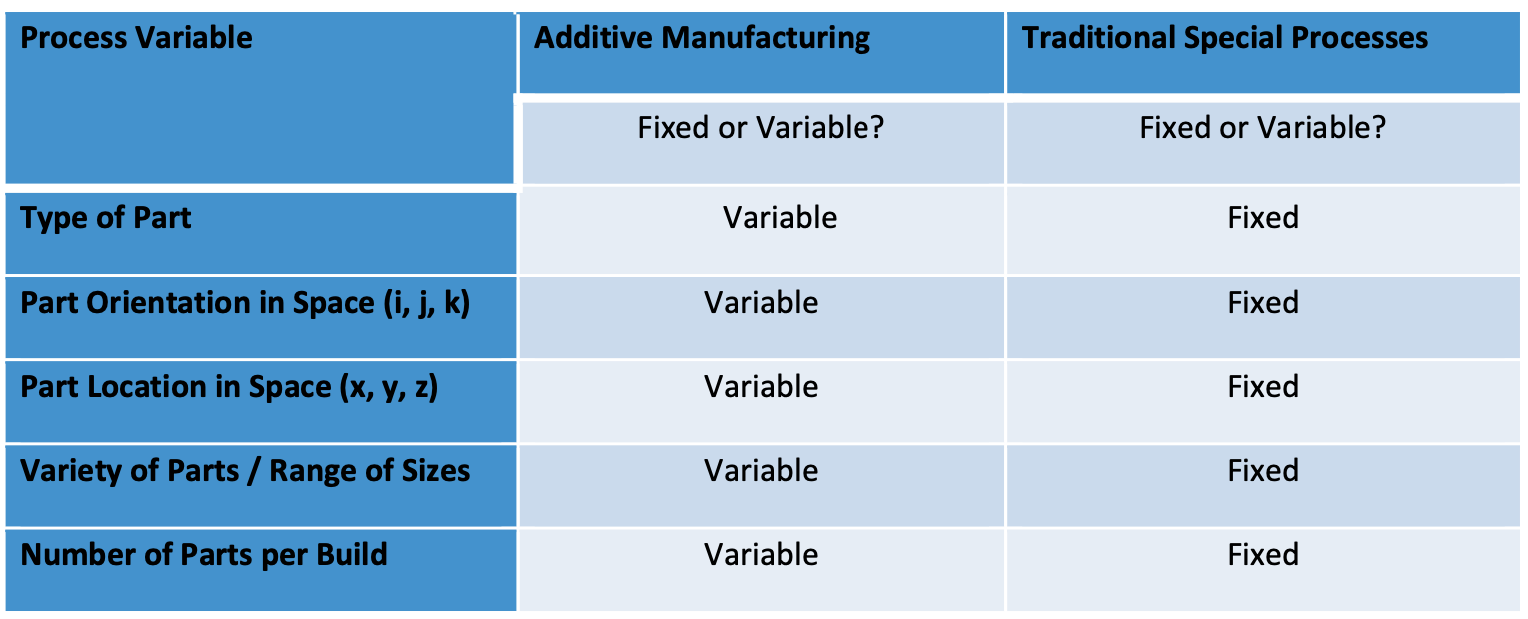
Once the process window has been defined and the worst-case build file has been established, the OQ and PQ can be executed.
Operational Qualification (OQ)
 The purpose of an OQ is to prove that parts made to the limits of the processing window will meet the design requirements.
The first step of OQ is to develop the production processing window based on the Process Characterization step results.
The next step is to write an OQ protocol that describes the parts to be tested, the processing window extremes to be challenged, the number of parts to be produced at each processing window extreme, the test method used to evaluate the parts, and the acceptance criteria for the devices created by the process. The protocol is then executed, and the results are documented in an OQ report.
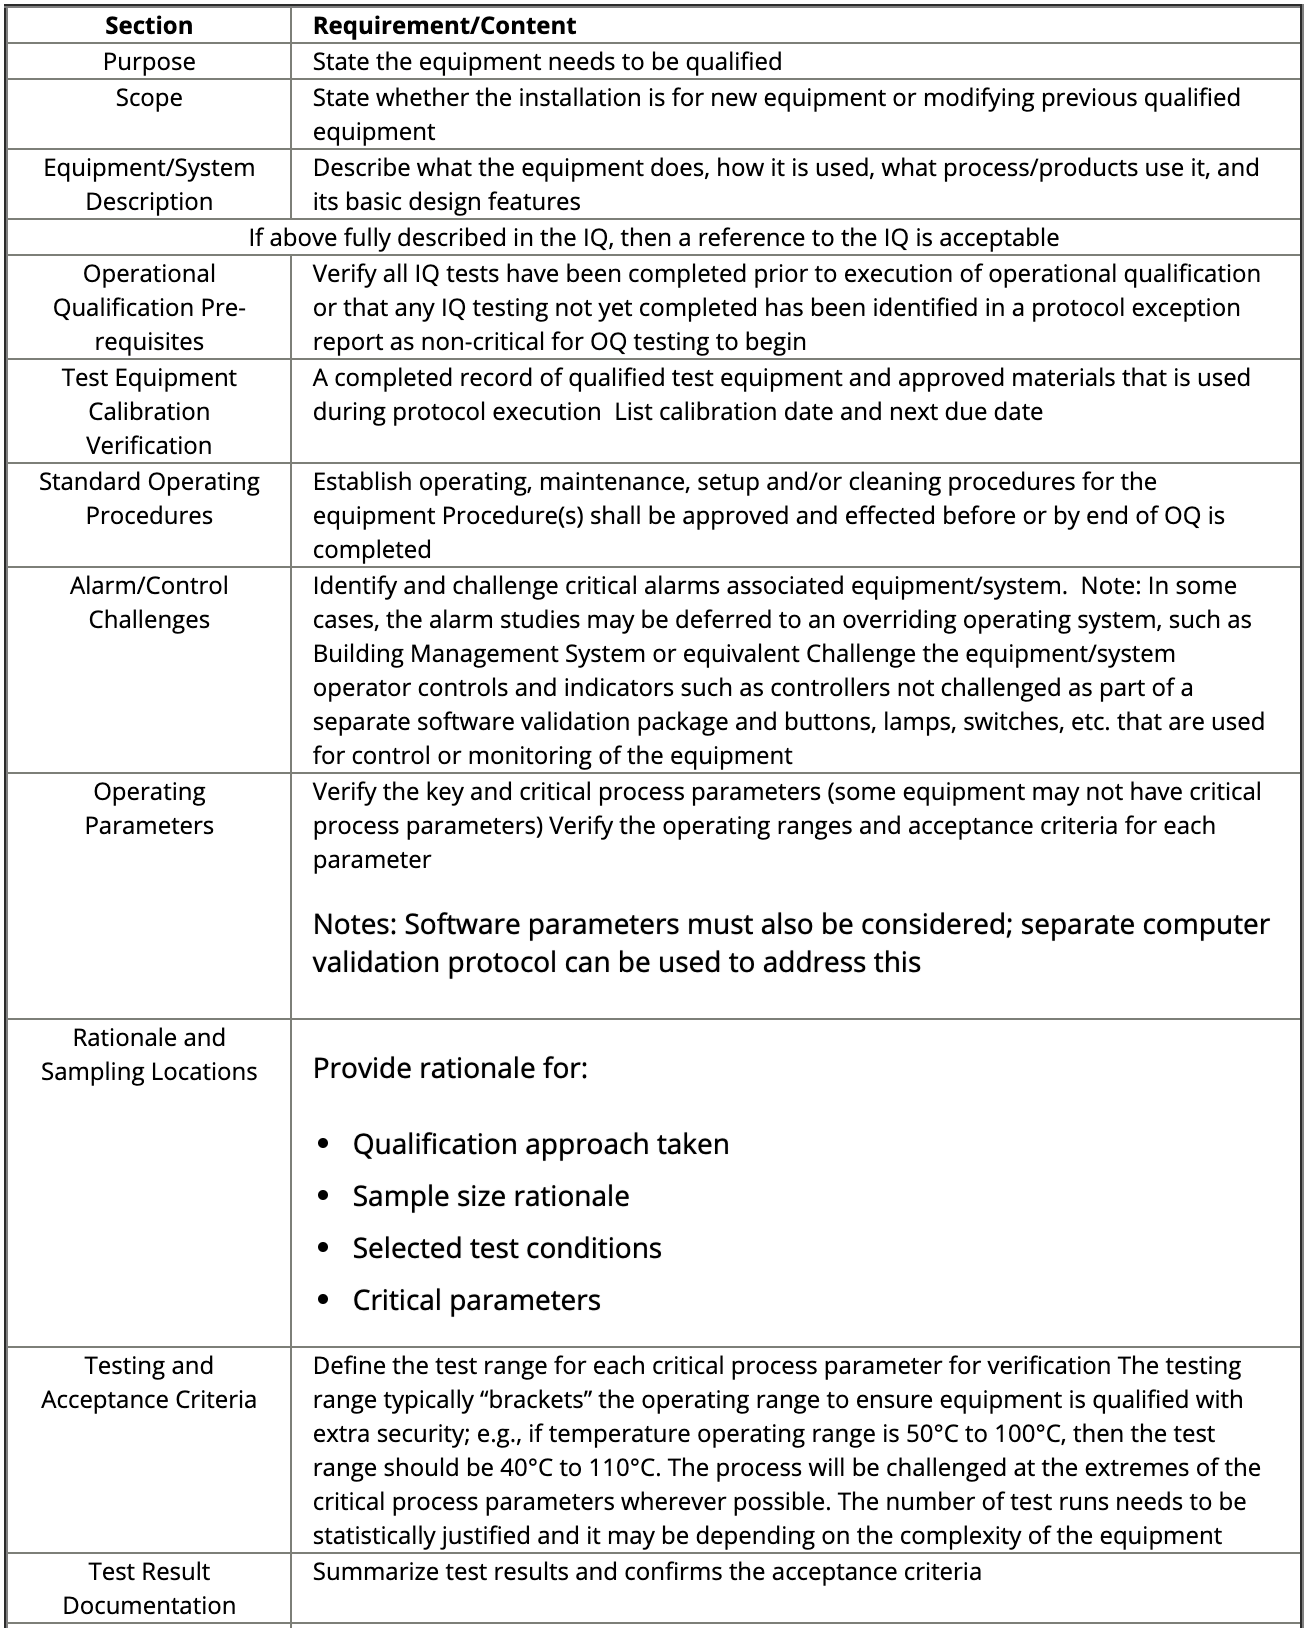
Figure: OQ sections and requirements. Source: IVT Network
Performance Qualification (PQ)
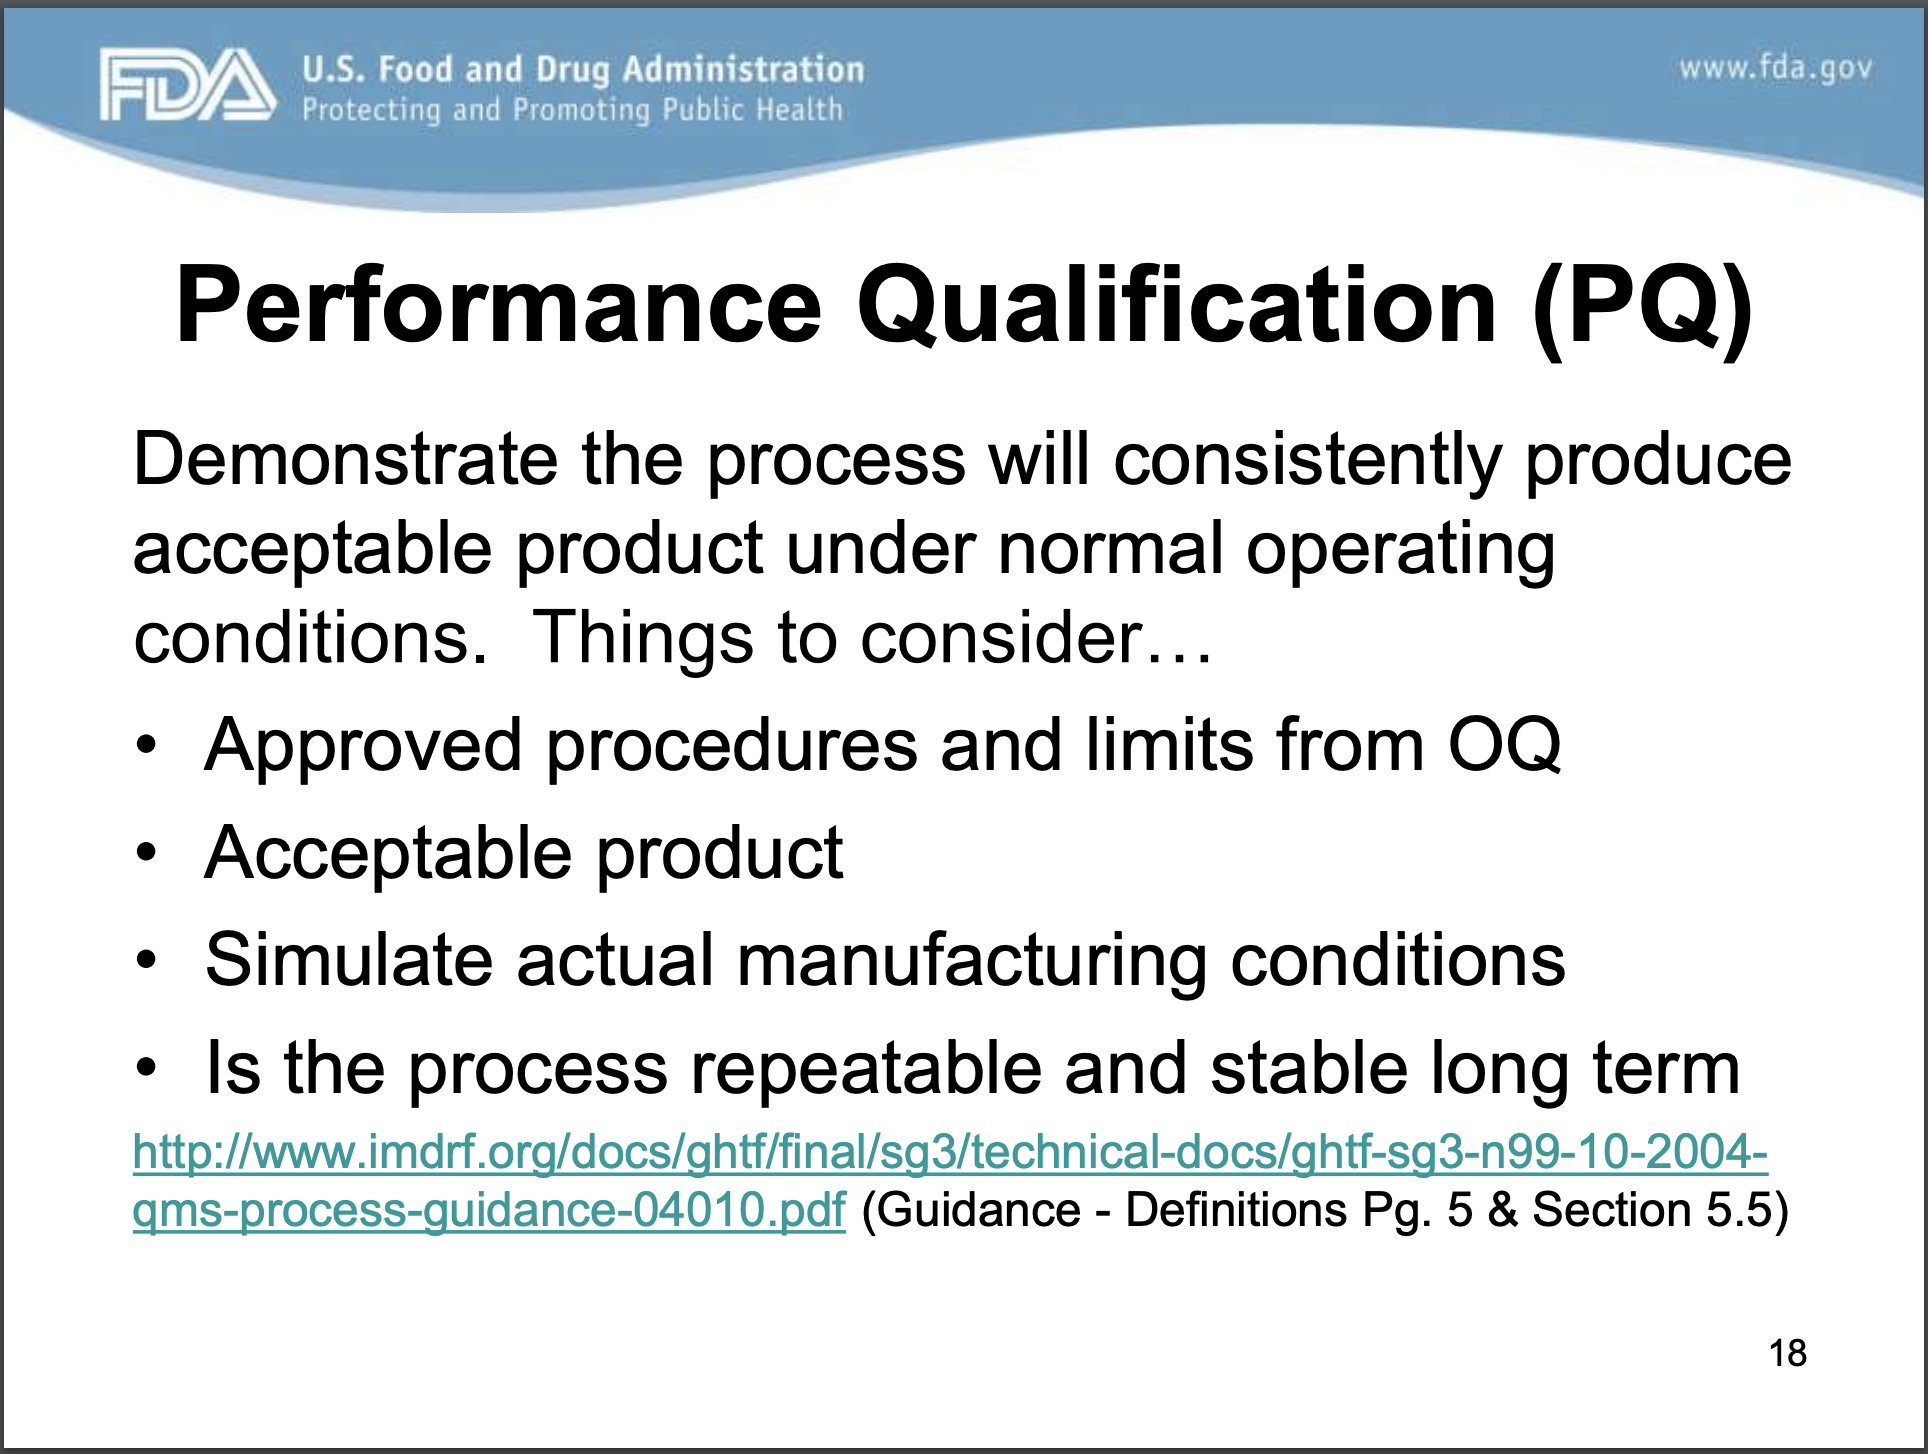 The PQ demonstrates that the manufacturing process can produce a consistent result using the nominal processsetting every time the process is run.
The idea is to demonstrate that the process can produce the same result consistently when considering the various sources of common-cause variation, such as manufacturing shut-downs for maintenance, change-overs from one job to the next, raw material lot changes, etc.
The first step is to establish the nominal processing settings. Typically, these settings are midway between the extremes established in the OQ. The next step is to write a protocol that describes the parts to be tested, the nominal processing window, the number of simulated production runs, the number of parts to be produced per run, the test method used to evaluate the parts, and the pass/fail criteria. The protocol is then executed, and the results are documented in a PQ report.
Managing Updates to 3D-Printed Devices
How medical device companies manage changes and updates will undoubtedly have a considerable impact on their business, including their internal processes and the products that they design, develop, manufacture, and distribute into the market. Ultimately, how companies handle and manage changes will impact patient lives.
As needs for changes arise, you’ll need to properly manage any changes made to ensure everything is accounted for in your quality management system and the resulting documentation and records.
New products, processes, or controlled documents all require change management practices to be put in place. Changes can involve modifications to records and procedures in your design controls or your device master record (DMR). You might find yourself needing to do additional validation on a device, or maybe you are changing suppliers, which requires changes to associated documents and procedures.
Revalidation may be required when there is a change in a process, especially when it is a change that would require the requalification of the IQ, OQ, or PQ. Activities that can trigger the need for revalidation include:
-
Design change that creates a new worst-case condition
-
Addition of a new part size in a part family where the new part size represents a new worst case
-
Relocation of the validated manufacturing equipment
-
Addition of new manufacturing equipment
-
Negative trend(s) in quality indicators (FDA QSR Process Validation)
Software and firmware changes and updates can also lead to the need for revalidation. For this reason, it is essential to track process updates and understand the purpose of each update, as well as the necessity of it, even if it doesn’t require you to revalidate your process. Formlabs provides release notes for all PreForm firmware updates to make changes easier to track and understand. Some of these updates may require revalidation (i.e., those that change the process itself), while others may not.
As with product development in general, change management requires a high degree of traceability within your quality management system (QMS). That means transparent, traceable relationships between the different stages of the change management process documented in your QMS. If this is done correctly, you will see how each decision you make in change management leads into the next, carefully documenting each step of the process in chronological order.
Some different standards and regulations outline the QMS requirements that will dictate your change management procedures. Design change management is covered under 21 CFR §820.30(i), and 21 CFR §820.40(b) covers document control changes. Changes should be verified or, where appropriate, validated, according to 21 CFR §820.75 before implementation. In terms of international standards, document and design change management is discussed in ISO 13485 (see section 4.1.4 for change management requirements specific to QMS processes).
Please visit the Greenlight Guru Definitive Guide to Change Management for Medical Devices for more information on change management.
Formlabs Resources For Verification and Validation
In addition to the resources referenced in the Takeaways from Regulatory Bodies: FDA section of Chapter 5, medical device manufacturers can also consider these resources from Formlabs:
Formtest: Measuring 3D Printer Reliability
In the context of additive manufacturing, reliability has multiple meanings. Each speaks to a different situation, but all pertain to one underlying question: “If I print something, will it meet my expectations?” We can break down this question further into four categories: If I print something, will it:
-
Print the same as last time? Print-to-print reliability.
-
Print the same on all of my printers? Printer-to-printer reliability.
-
Print the same the first time and the 100th time I print it? Ongoing reliability.
-
Complete successfully? Field reliability.
The Formtest is a model that can evaluate the performance and reliability of a 3D printer. The part’s features help us assign quantitative scores related to printer performance. In designing the Formtest, we identified four aspects as most likely to vary between printers and multiple prints within printer:
-
Positive features (wires, walls, etc.).
-
Negative features (holes, slots, etc.).
-
Structural features (bridges, overhangs, etc.).
-
Dimensional accuracy (small dimensions, larger dimensions).
The Formtest contains features for all four categories mentioned before, as well as a fifth “functional” category to relate the results to real-world applications:
-
Positive features: wires and two sets of walls.
-
Negative features: holes and two sets of slots.
-
Structural features: two sets each of bridges and overhangs.
-
Dimensional features: base and octagonal-base cylinder with known dimensions.
-
Functional features: M3 nut hole, M4 bolt, M4 threaded hole.
For more detailed information on Formlabs dimensional accuracy tests, please read below. For a free STL, OBJ, or .Form version of the Formtest, contact Formlabs.
Understanding Accuracy and Precision in 3D Printing
The quality of end-use parts in additive manufacturing can be evaluated with several metrics, one of which is dimensional accuracy. For some applications, such as surgical guides or jigs and fixtures for medical devices, dimensional accuracy is paramount to whether the part is usable.
What impacts dimensional accuracy?
-
The 3D printer used to create the part. In some cases, there may be accuracy variations between printers.
-
The materials selected for the part.
-
Support placement on and removal from the part.
-
The post-curing steps taken after the parts are cleaned.
Formlabs created an internal test called the Formtest to determine the dimensional accuracy of Form 3 and Form 3B. We tested two models, one with features under 50mm and one with features over 50mm. Notably, we printed multiple parts per printer across several printers to highlight Form 3’s ability to repeatedly accurate parts.
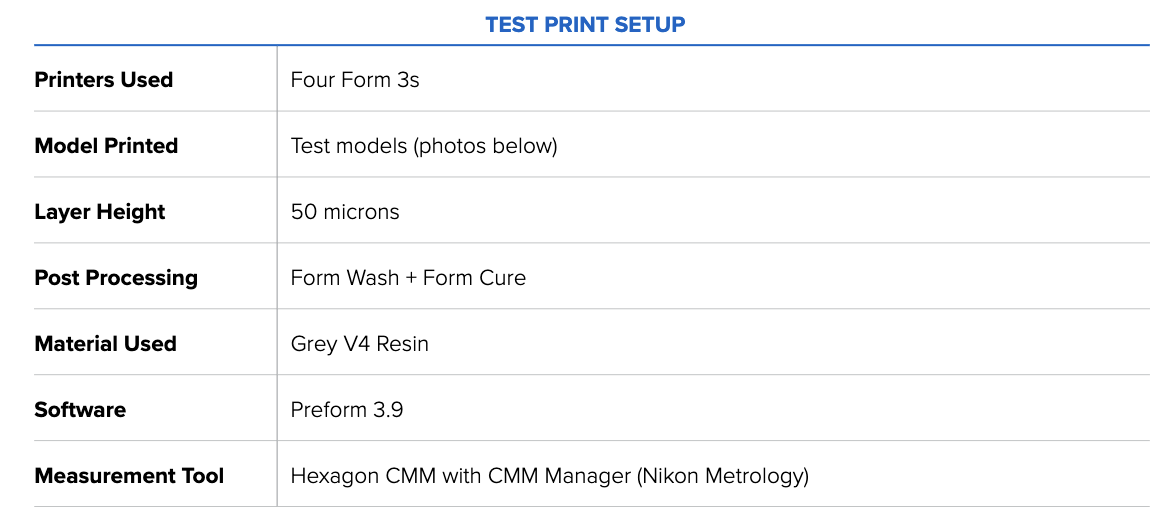
The image below shows the test print in PreForm. Each test contains two features for each 1 mm, 4 mm, 9 mm, 27 mm, and 50 mm dimension, measured in the XY direction.

The topline results are as follows: The average deviations from the ideal, or exact, print size are small, ranging from 0 to 100 microns. Form 3, printing in Grey Resin, demonstrates consistent accuracy across multiple prints and sizes, meeting the requirements for various manufacturing applications. The table below details the average deviation from the ideal or perfect print for each intended feature size.
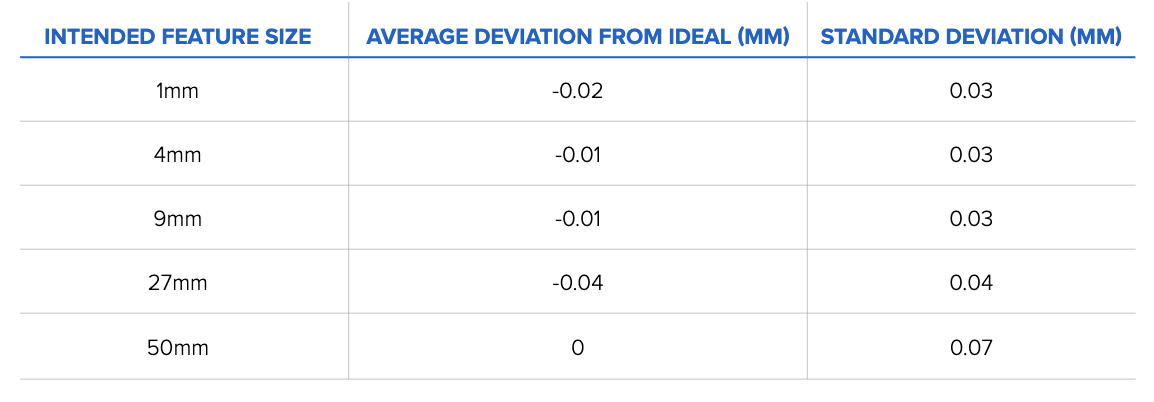
Table 1: Average size deviation and standard deviation results binned by intended feature size (n = 160 for 1 mm, 9 mm, 27 mm, and 50 mm features, n = 320 for 4 mm).
This table shows how Form 3 meets the accuracy requirements required for 3D printing applications. These results represent data accumulated over 160 test prints, meaning the printers are reliably accurate over a range of prints.
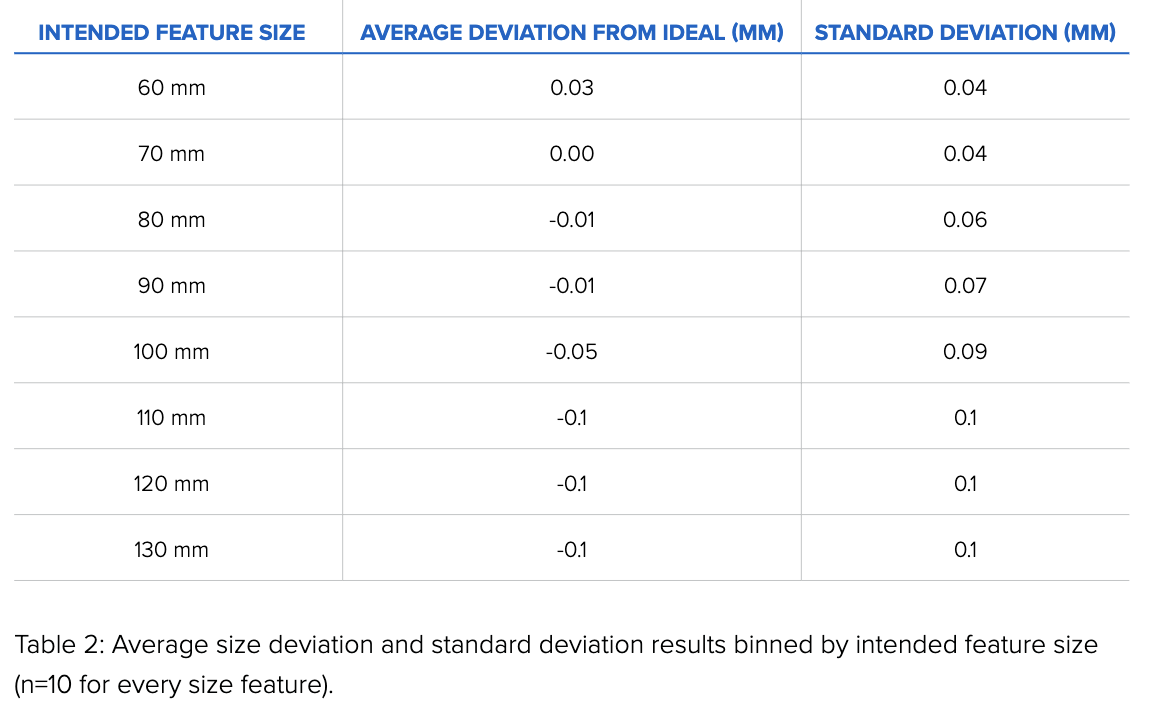
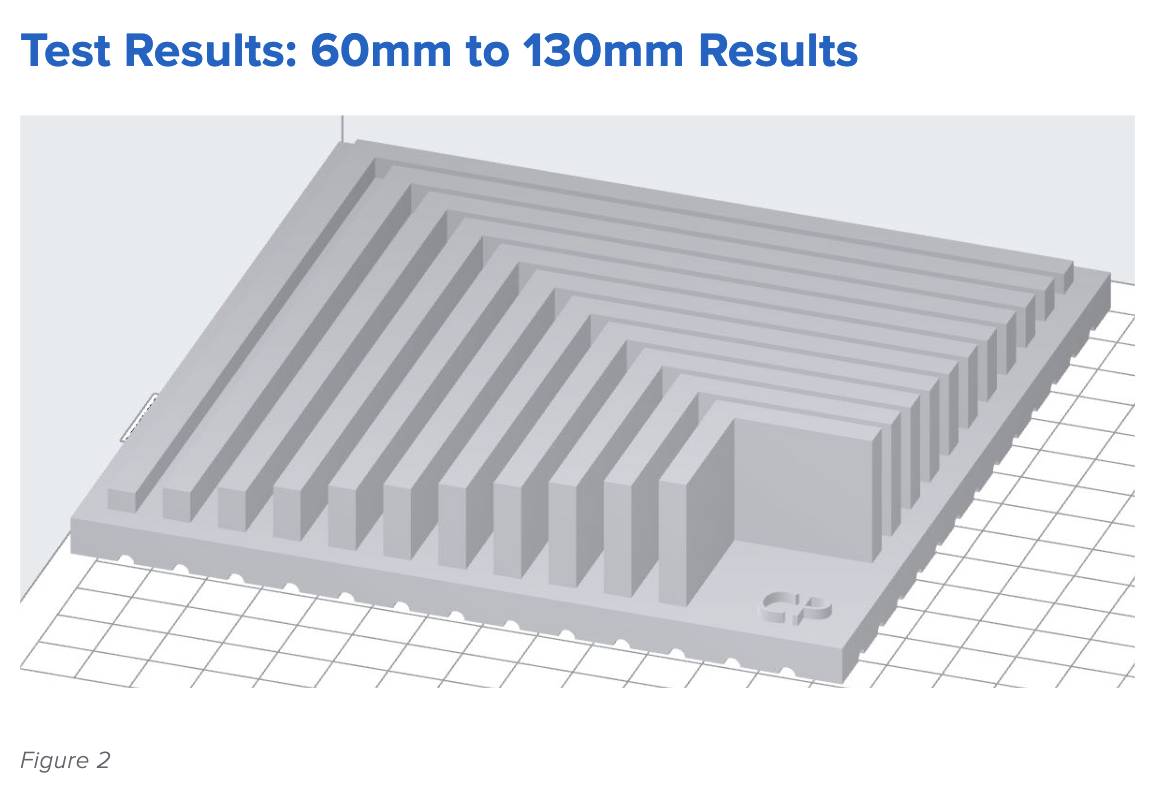 Figure 2 offers a look at a range of larger sizes, from 60mm to 130mm, increasing in increments of 10mm.
Our results are similar to those obtained by the smaller test print size in Figure 1: the Form 3, printing in Grey Resin, shows little to no variation in size tolerance across a range of sizes.
When these results are grouped by size, the data shows that the average deviations from the ideal are small, ranging from 0 to 100 microns.
The data presented in the tables above (full report here) is only for the printed parts as shown in Figure 1 and Figure 2. It is not possible to extrapolate from this data that all prints of the same size will perform exactly the same. Still, Formlabs is confident in the accuracy of its printers across all available Formlabs resins. As noted, all prints in this report were created in Grey Resin.
All Formlabs resins undergo a rigorous testing process before being released, and we would expect to see similar results across our material portfolio. However, variations may occur, especially depending on part geometry. Not all printers or resins will output exactly the same results.
Some printers, by the nature of mass production, will skew larger or smaller on average. This phenomenon can be observed in our dataset, with some printers creating parts slightly larger than average, and others slightly below average. This is a normal print variance present in 3D printing.
Additionally, degrees of freedom that cause distortions and anisotropic shrinking can contribute significantly to dimensional inaccuracies. Formlabs calibrates all 3D printers before shipping, resulting in a much tighter distribution of variations. Calibration reduces, but does not completely eliminate, these inaccuracies. If you have additional questions about the accuracy of our printers, please contact a sales expert.
Additional Formlabs Resources for V&V
Commercialization Considerations
For a detailed guide on bringing medical devices to market, please review this resource from GG. A summary can be found below.
Device Classification
European Union
For information on how devices are classified under the EU MDR, visit this page.
SELF-CERTIFIED DEVICES
As part of your regulatory plan, you have already determined which EU directives apply to your device and determined the classification of your device. Implementing a quality management system that is compliant with ISO 13485 is a crucial piece that should already be done at this point. You will also need to identify a notified body and have them audit you to ISO 13485 so you can receive your Certification. Class I devices can be self-certified, so your notified body will not need to review technical file documentation.
CERTIFIED DEVICES
The technical files for Class IIa and IIb devices or design dossiers for Class III devices will need to be reviewed by your notified body to obtain a CE certificate. The technical file/design dossier is very similar to the DHF, but there are some differences. One is that your notified body often expects a specific format for the documentation. Oftentimes you can take information directly from the DHF and rearrange the format to please your notified body. One crucial step that is sometimes overlooked is establishing a physical location in Europe or appoint a European representative for your company. You then need to prepare a Declaration of Conformity (DoC), stating that your device complies with the appropriate directives.
At this point, you can contact your notified body to schedule the technical file audit. Assuming all goes well, they will submit a CE certificate for your product that is valid for three years.
UNITED STATES
For information on how devices are classified in the United States, visit this page.
Premarket Submissions
As we discussed previously, your device classification will dictate the type of submission to the FDA:
- Class II: Devices in this class pose a moderate level of risk to the user, and all of them require a premarket notification (510(k) submission) before they can be legally marketed. Items like pregnancy testing kits, intravenous kits, sutures, and powered wheelchairs could fall into this category. These devices are important for health care, but a malfunction would be unlikely to cause critical harm to a patient.
- Class III: Class three devices are typically either implanted medical devices or those that sustain life, like an implantable pacemaker, blood vessel stents, or other implanted devices. Devices in this class are seen as the highest risk for patients, as any problems with the device could lead to significant adverse outcomes for the patients. Class III devices require pre-market approval (PMA) submission before being marketed in the USA.
The purpose of a 510(k) submission is to provide the FDA with documented evidence that proves that your medical device is substantially equivalent to a predicate device, one already approved for marketing by the FDA.
Proving substantial equivalency means that you’ll need to compare and contrast your device with the predicate device. While laboratory testing is a typical requirement, human testing is usually not needed for 510(k) submissions.
Information from your documented Design Controls process, such as intended use, indications for use, design inputs, and design verification are all valuable inputs for your 510(k) submission. The FDA processes 510(k) applications in 30-90 days. There can be an extended period of back and forth discussions in some cases, delaying the time to actual clearance. You should consider this when you build your project timeline.
A PMA, on the other hand, is more in-depth than a 510(k); it is used to prove that a new device is safe and effective for the end-user and typically requires clinical trials with human participants, along with laboratory testing. The standards here are much higher than for 510(k) submissions, and the FDA has just 180 days to accept or reject the application.
Another less commonly used option, the De Novo pathway, is a classification process that uses a risk-based methodology for the approval of new and novel devices to be sold in the market.
Generally speaking, companies using the De Novo pathway do not qualify for 510(k) clearance because there is not an existing predicate device substantially equivalent already on the market. Since they are not showing equivalence to a predicate, companies must be prepared to argue their robust risk mitigation strategy when submitting a De Novo request.
Class I Devices
Class I devices are simple, with minimal risk to the user. They are subject to the general regulatory controls of medical devices and typically do not require any premarket submissions.
Point-of-Care or Hospital-Based Manufacturing
The use of additive manufacturing within hospitals is accelerating, with hundreds of clinical publications highlighting the use of Formlabs technology to develop surgical tools, including patient-specific preoperative planning anatomical models, implant sizing templates, and cutting and drilling guides.
The scope of this document is for medical device manufacturers that are subject to regulation, audits, and other requirements specific to commercial entities that are marketing devices. Hospitals that produce instruments under the practice of medicine may not be subject to the same regulatory requirements (requirements vary by region). However, the same principles behind a QMS still apply.
Several sections and tables, including the Technical Considerations table and the MDR: Custom Devices section in Chapter 5, speak specifically about point-of-care requirements. Still, this document is not written to be a comprehensive guide for hospital-based 3D printing.
Outside of this guide, the US FDA’s Center for Devices and Radiological Health (CDRH) has an Additive Manufacturing Working Group conducting a stakeholder engagement process for its Conceptual Framework. For the latest information on 3D printing at the point-of-care, please consider the following links:
-
Pew Charitable Trusts, What Is Medical 3D Printing—and How Is it Regulated?
-
American Society of Mechanical Engineers (ASME) - 3D Printing at the Point of Care
-
Formlabs Clinical Innovator Content Series: Resources from imaging to sterilization, presented by clinicians
In the EU, point-of-care manufacturing for health institutions may fall under the exemptions in Article 5 of the EU MDR. While Article 5 exempts health institutions from specific requirements, a QMS and Annex I General Safety and Performance Requirements still apply. For those manufactures that do not qualify for an exemption, their device may be considered custom. For more information on if your device is a custom device or patient-matched, please see the MDCG guidance document. Please see the MDCG checklist Formlabs has prepared as a guide to determine if your device is a custom device.
Please contact Formlabs (healthcare@formlabs.com) with any specific questions on this topic.
Appendix
Below you will find a shortlist of relevant resources that do not fit into the main body of this guide:
-
17 Free Resources for Product Developers to Accelerate Bringing a Device to Market
-
Ultimate Guide to Training Management for Medical Device Companies
-
Beginner’s Guide to Design Verification and Design Validation for Medical Devices
Looking for a design control solution to help you bring safer medical devices to market faster with less risk? Click here to take a quick tour of Greenlight Guru's Medical Device QMS software
Free eBook:
Ultimate Guide to QA/RA in Medical 3D Printing
Ultimate Guide to QA/RA in Medical 3D Printing

%20Ultimate%20Guide%20to%20QARA%20in%20Medical%20Device%203D%20Printing-1.png?width=180&name=(cover)%20Ultimate%20Guide%20to%20QARA%20in%20Medical%20Device%203D%20Printing-1.png)
%20Ultimate%20Guide%20to%20QARA%20in%20Medical%20Device%203D%20Printing-2.png?width=250&name=(cover)%20Ultimate%20Guide%20to%20QARA%20in%20Medical%20Device%203D%20Printing-2.png)