.png?width=800&height=400&name=A%20Better%20Way%20to%20Develop%20A%20Medical%20Device%20with%20Digital%20and%20Physical%20Elements%20(Part%202%20of%202).png)
In Part 1 of this two-part blog post series, we explained why next-generation medical devices with hardware/software interactions need a new, holistic development methodology.
Now, in Part 2, we will share a new process we have been testing for designing an even more cohesive digital/physical experience.
The Old Way of Designing a Medical Device with Software and Hardware Elements
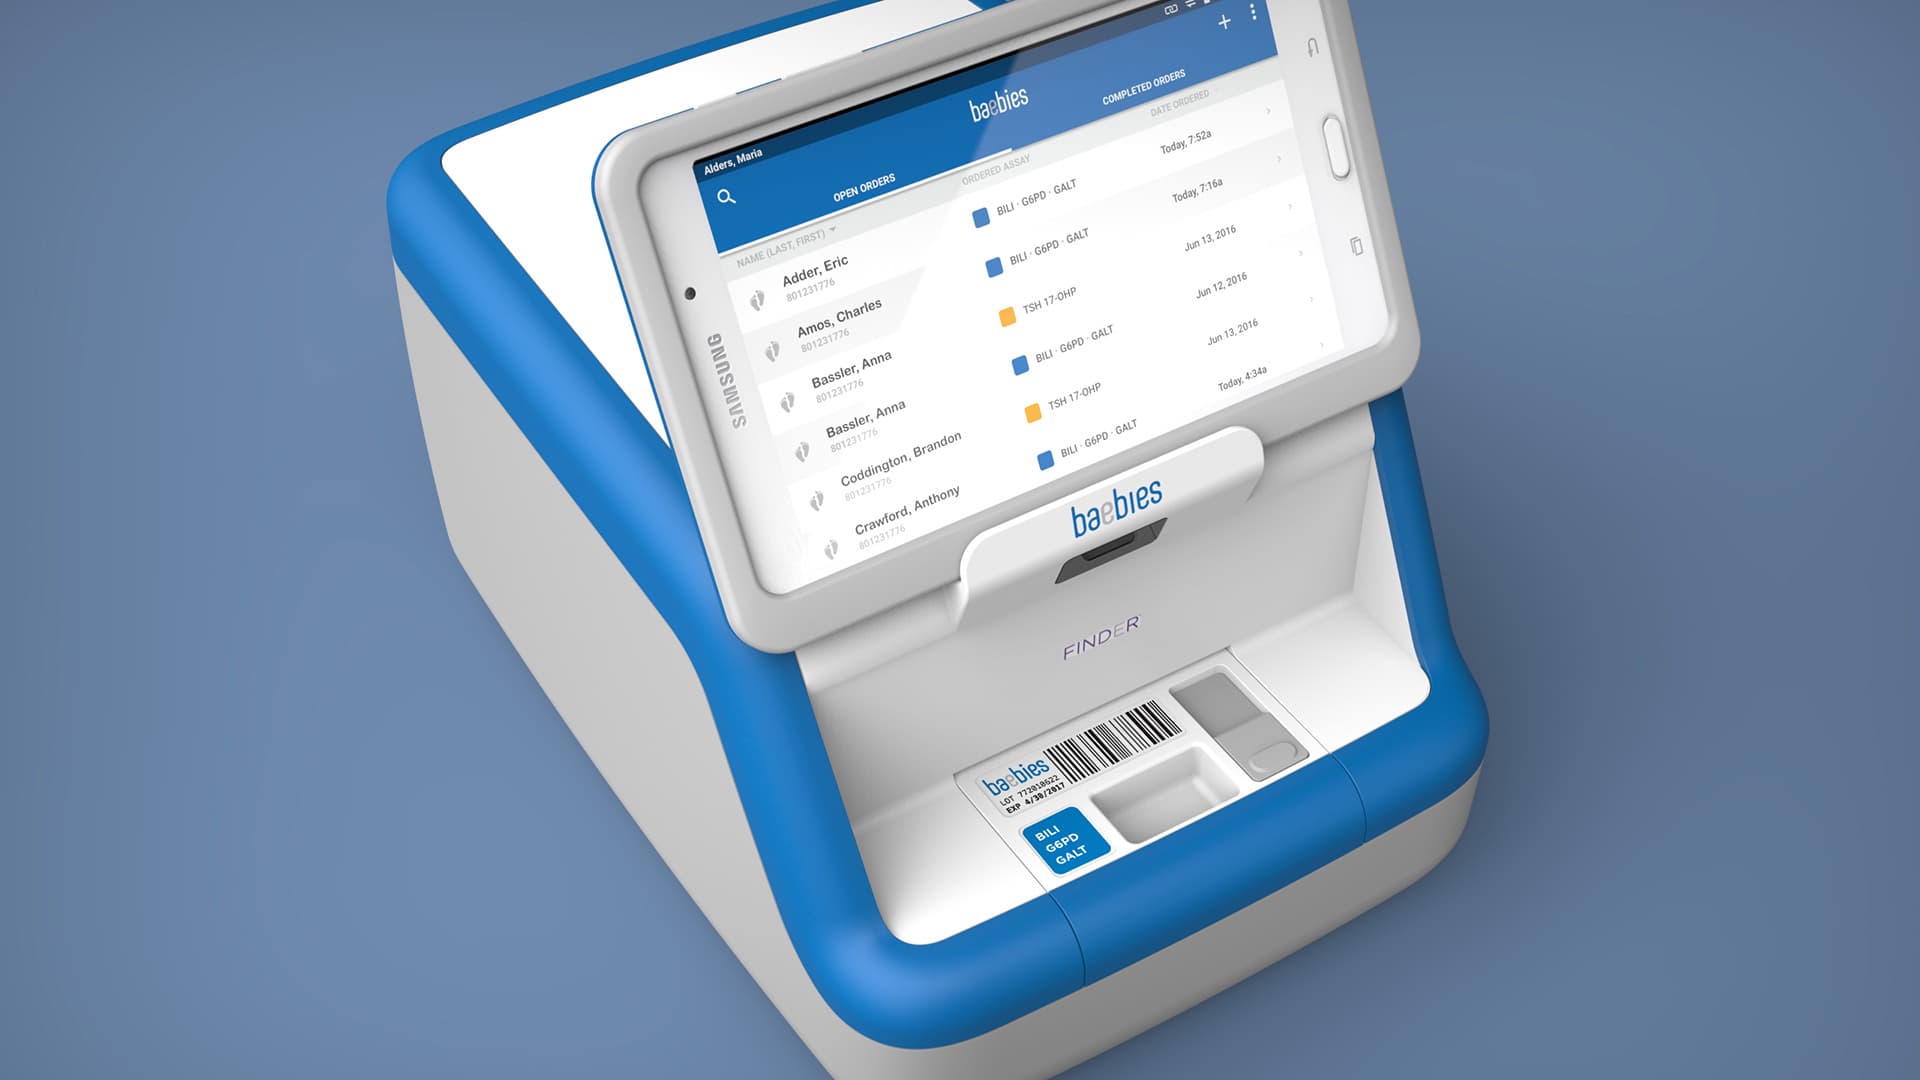
In part 1 of this blog series, we described the process we used to develop a cohesive digital/physical experience for the Baebies FINDER Testing Device.
- Phase 1: Information Architecture and Concepts Generation
- Phase 2: Interaction Design and Concepts Development
- Phase 3: Visual Design and Concepts Refinement
The authors gave this presentation to the Industrial Designers Society of America (IDSA) on December 14, 2022.
Below is an overview of that process, overlaid with a classic design-thinking double diamond diagram.
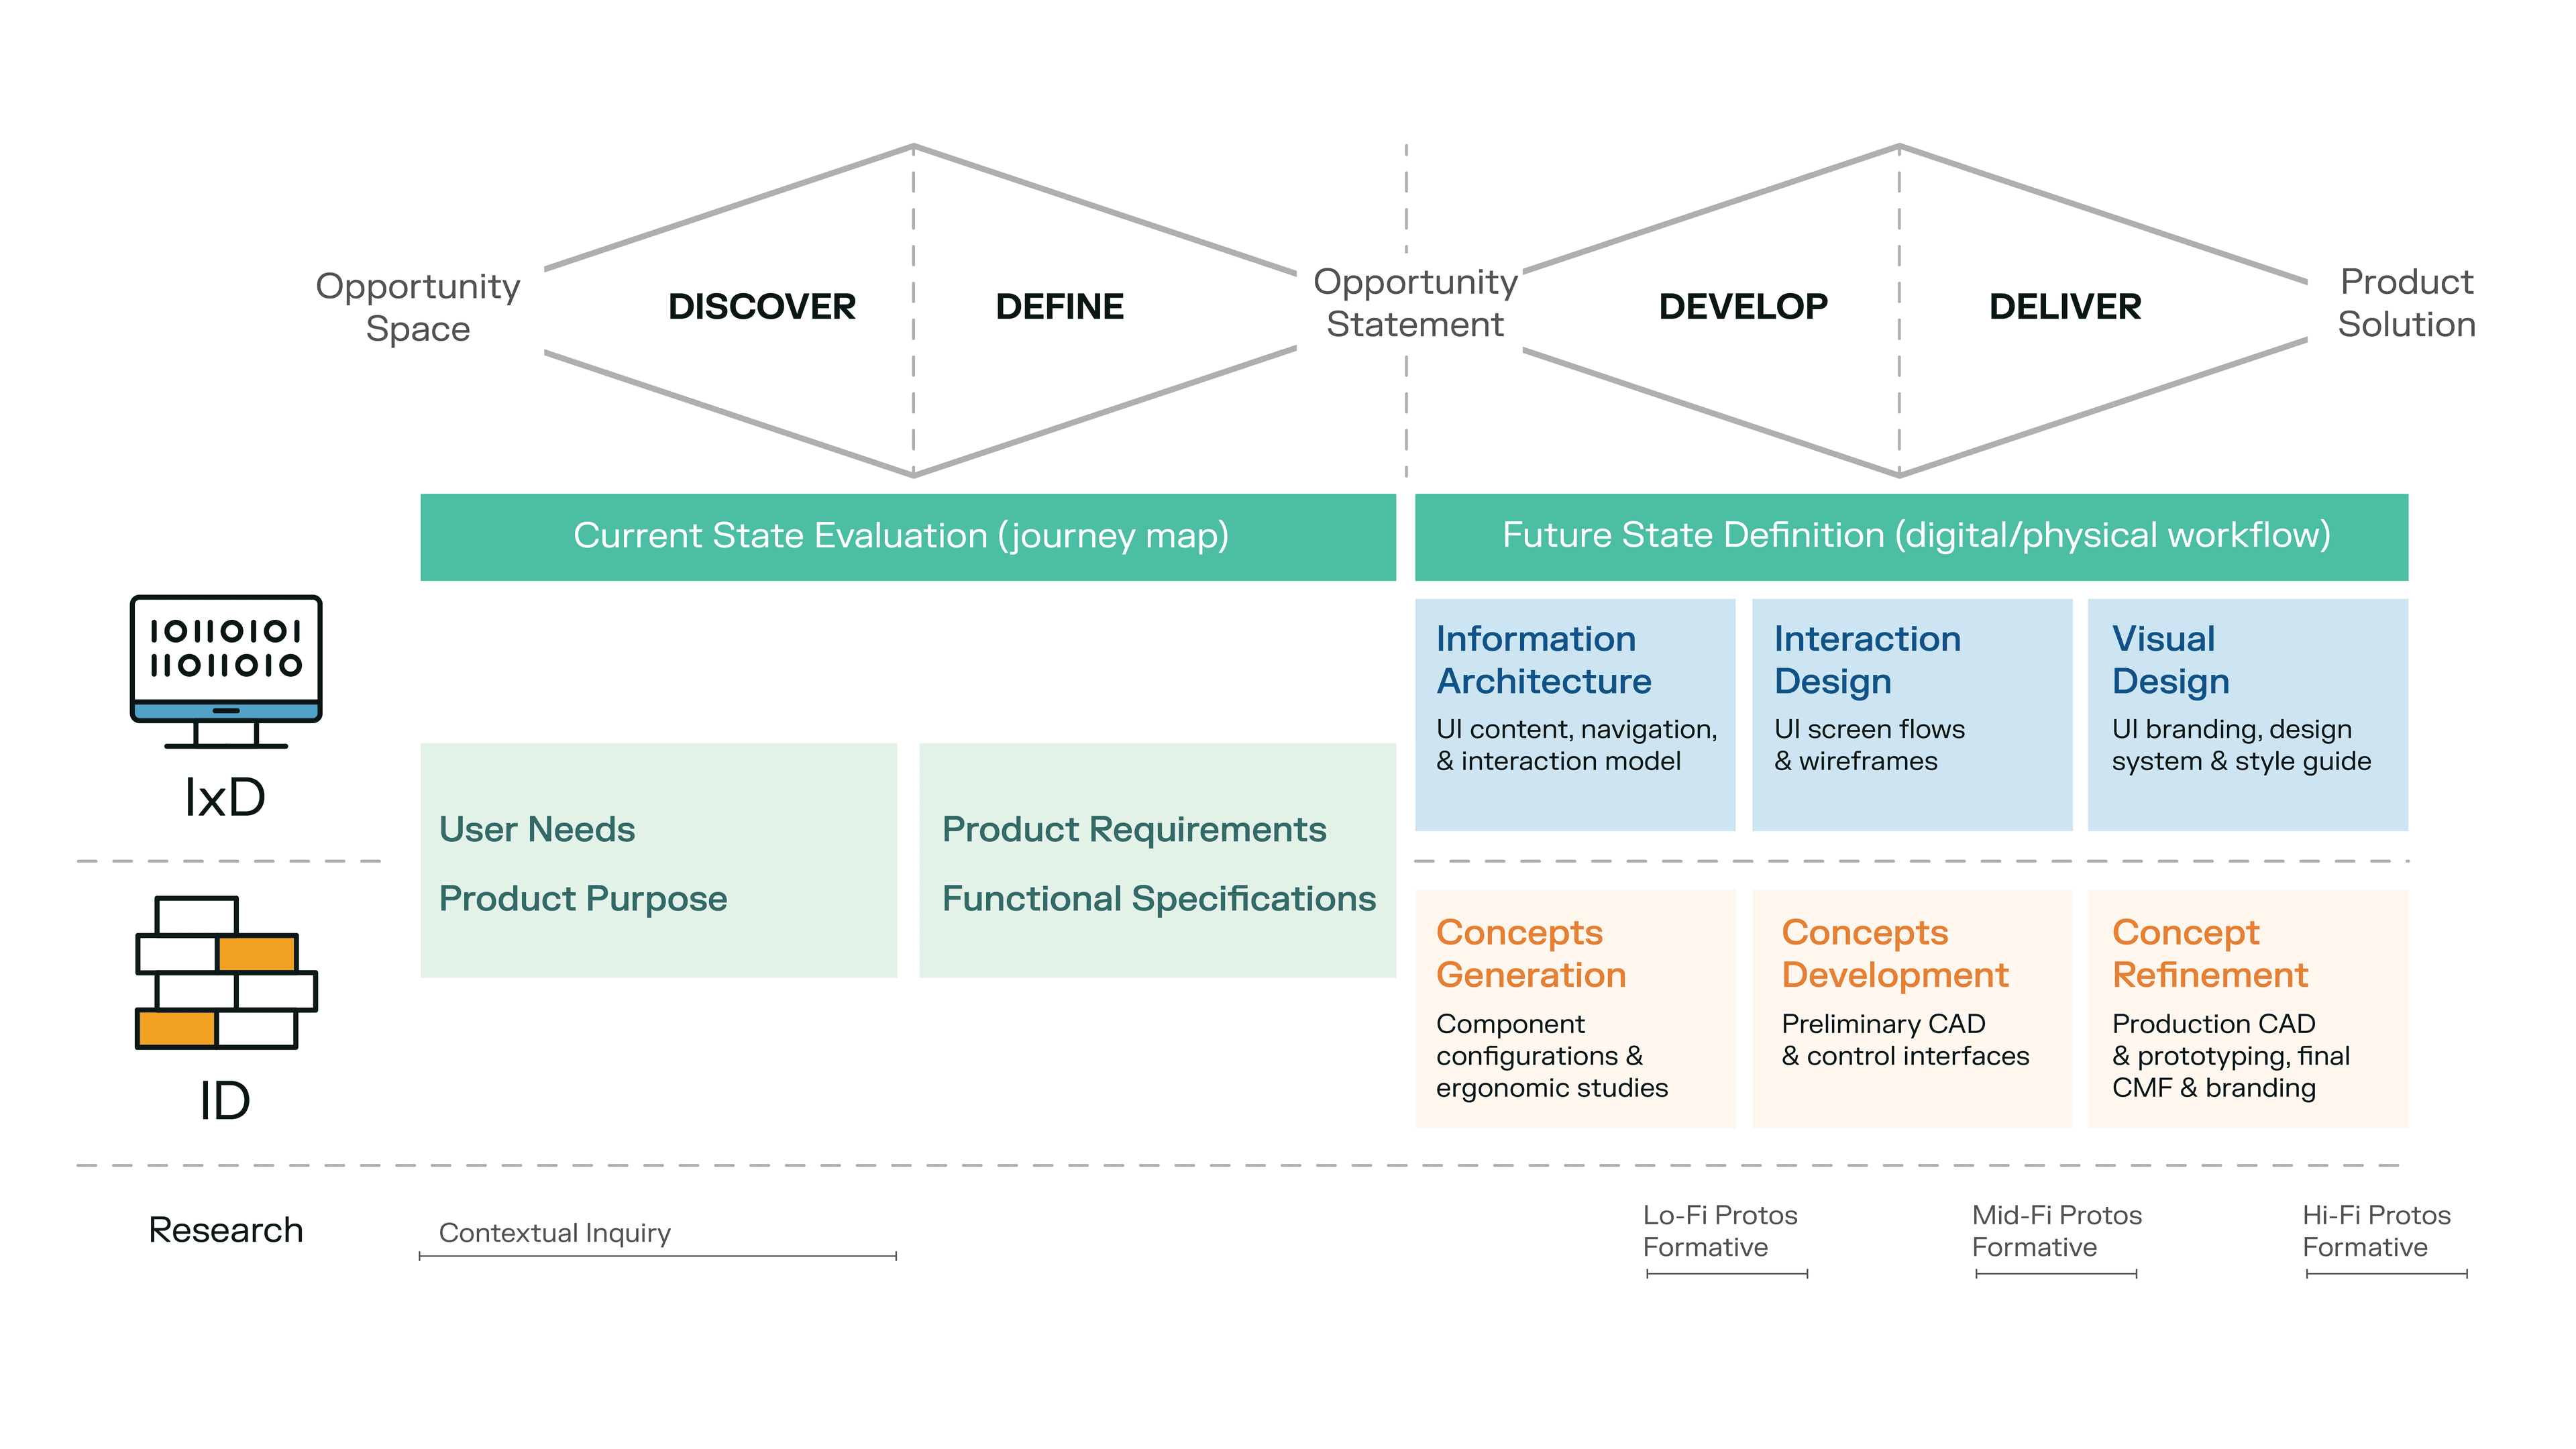
The Past: How Delve’s Interaction Design and Industrial Design teams collaborated on the Baebies project to create a cohesive digital/physical experience.
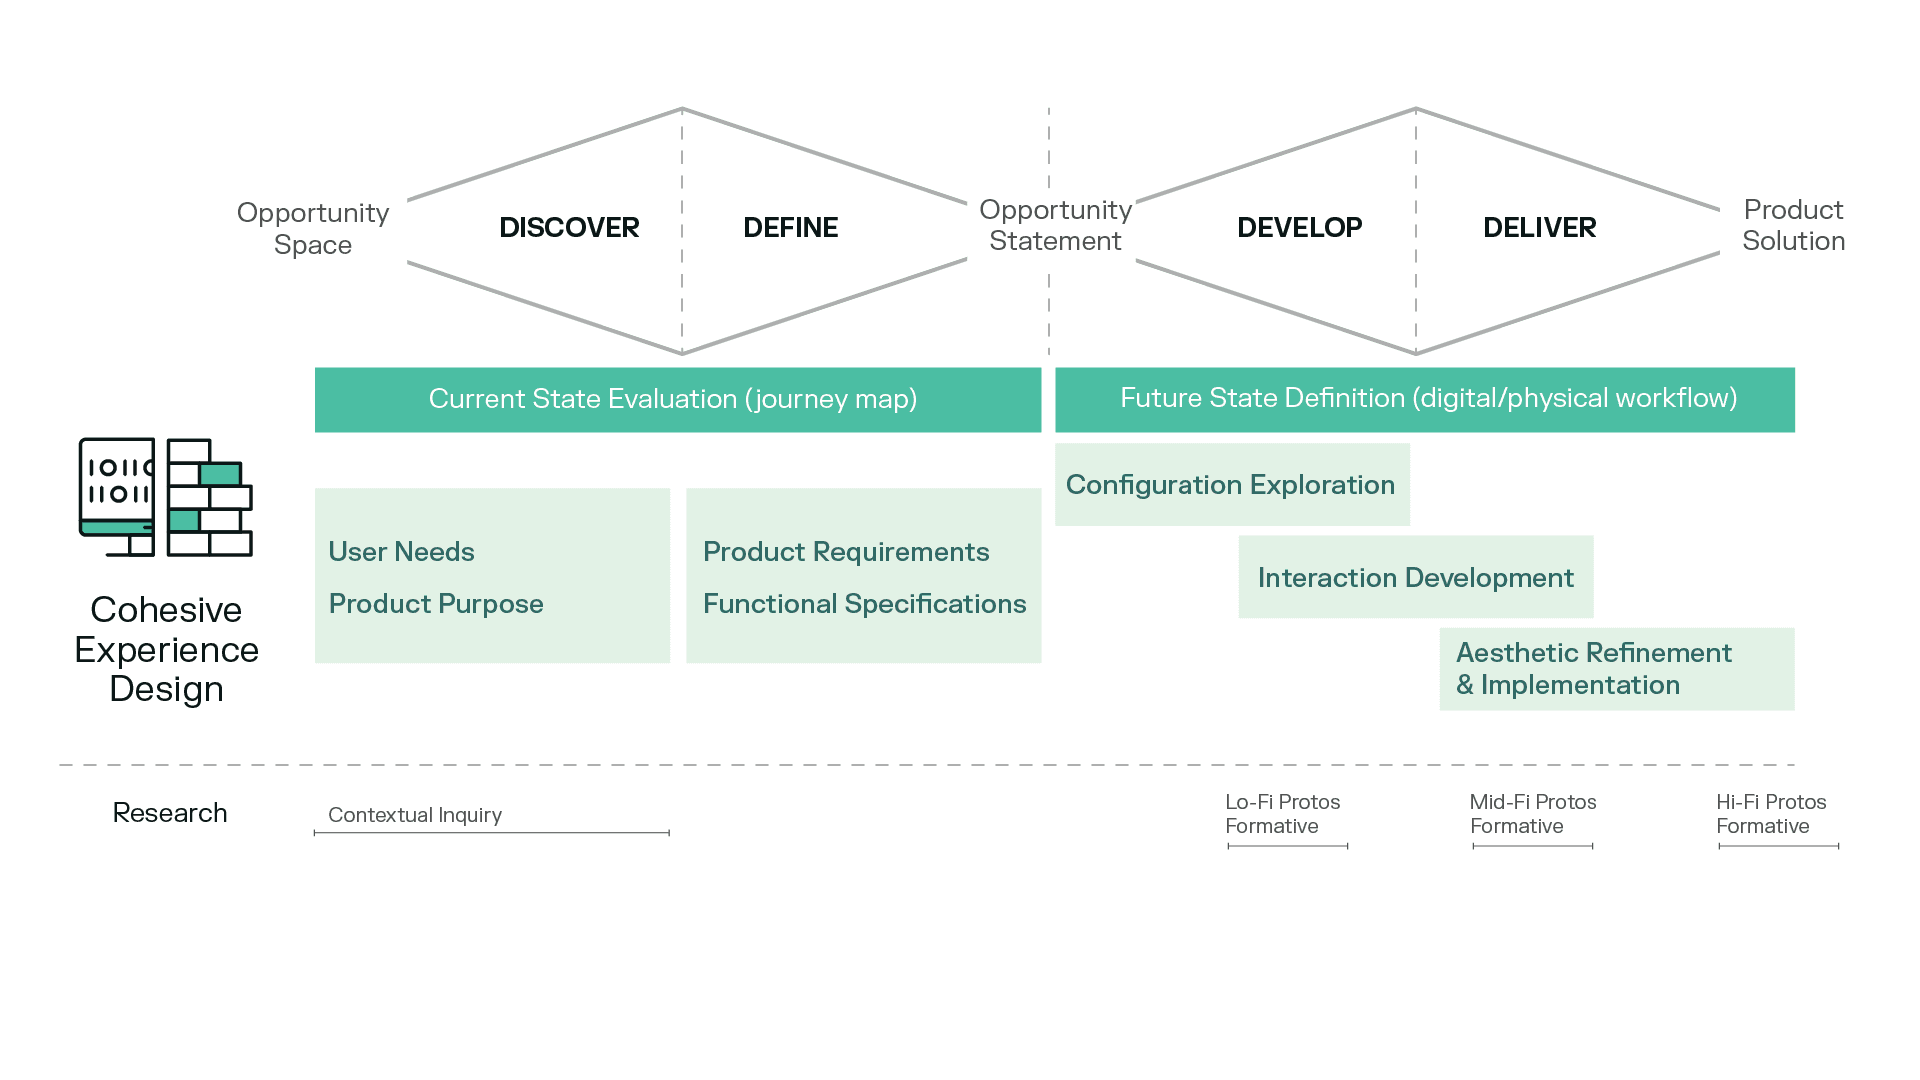
The Future: How we might improve the process.
A New Way to Design Medical Devices for a More Cohesive Software and Hardware Experience
Reflecting on the Baebies case study in our previous post gave us the opportunity to ask: How might we further break down the silos between digital and physical design?
Can we holistically merge digital and physical design tasks in medical device product development? What would such a methodology look like?
In our new methodology, we have redefined the three design phases as follows:
-
Phase 1: Configuration Exploration
-
Phase 2: Interaction Development
-
Phase 3: Aesthetic Refinement and Implementation
To understand how each redefined phase holistically merges digital and physical design tasks—and the associated opportunities for formative testing of low-fidelity, mid-fidelity, and high-fidelity prototypes—let’s look at each design phase more closely.
Related: Learn more about our medical device development services.
Phase 1: Configuration Exploration
In this phase, we:
-
Define foundational hardware and software elements and the key inputs and outputs of the system.
-
Explore digital and physical system architecture that would enable an effective ergonomic and interactive experience.
-
Validate that the most promising concept supports the future state workflow via low-fidelity prototypes.
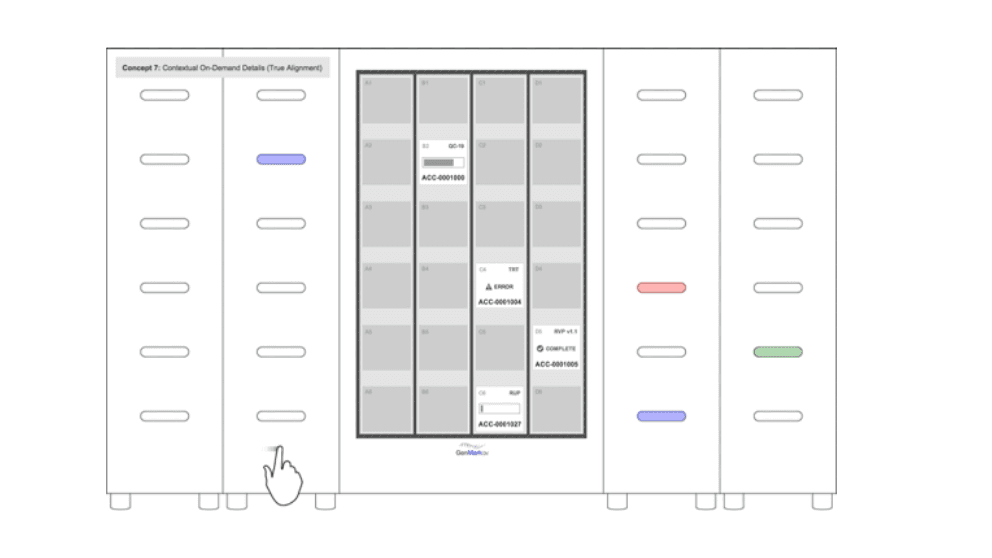
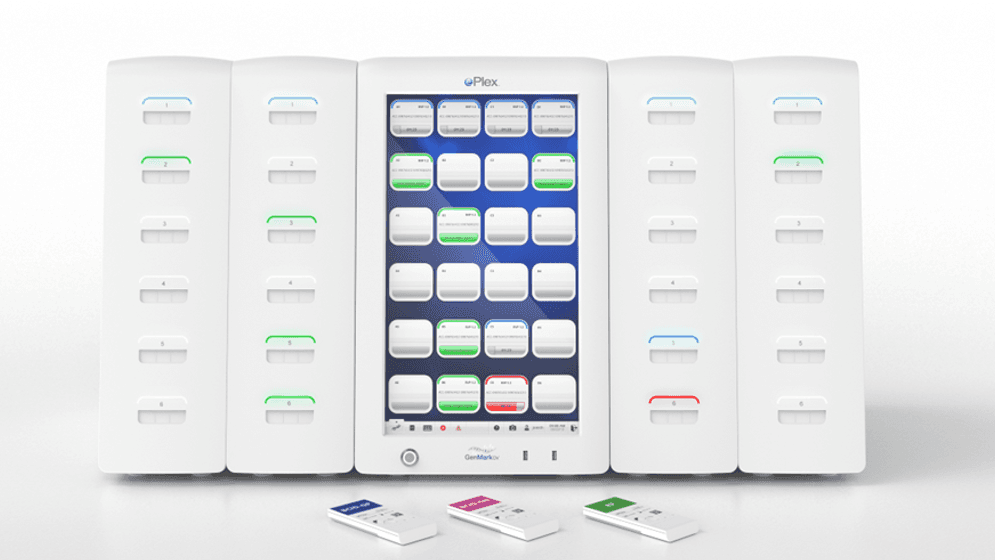
Questions about system architecture were fundamental in the early phase of our design work for the GenMark ePlex molecular testing device. The large central screen was key to creating an effective mapping experience across the user interface and the modular testing bays.
Defining the digital and physical system architecture of the device
In this early design phase, the main question we ask is: What might the overall digital and physical system architecture be for this device?
-
Does it have a screen to serve as a link between digital and physical interactions with the device? What is the size and orientation of the screen? Is the screen touch enabled or complemented by physical controls?
-
Is the software embedded, a connected app, or a connected workstation?
-
What inputs and outputs do we need to provide feedback for?
-
What other physical interactions and controls might complement the digital?
-
Is this the primary device vs. associated accessories or consumables?
The GenMark ePlex molecular testing device, above, is an example of a past project in which we knew from a very early stage that system architecture would be fundamental to our design. The device incorporated modular testing bays in columns that that could be arrayed from one to four units.
To produce a cohesive digital/physical experience, we needed to ensure that the mapping experience between the screen and the position of the cartridge bays would be seamless. So, a large central screen that could map those testing bays as accurately as possible was fundamental to the system architecture of this particular project.
Low-fidelity mockups representing different available touchscreen components and early electromechanical test bay volumes allowed us to dial in what system architecture options were most intuitive for users in a modular system.
Phase 2: Interaction Development
In this phase, we:
-
Define how hardware and software elements and interfaces work together.
-
Create synergy across all digital and physical touchpoints and feedback mechanisms across different workflows.
-
Validate the intuitiveness, effectiveness, efficiency, and safety of interactions via mid-fidelity prototypes.
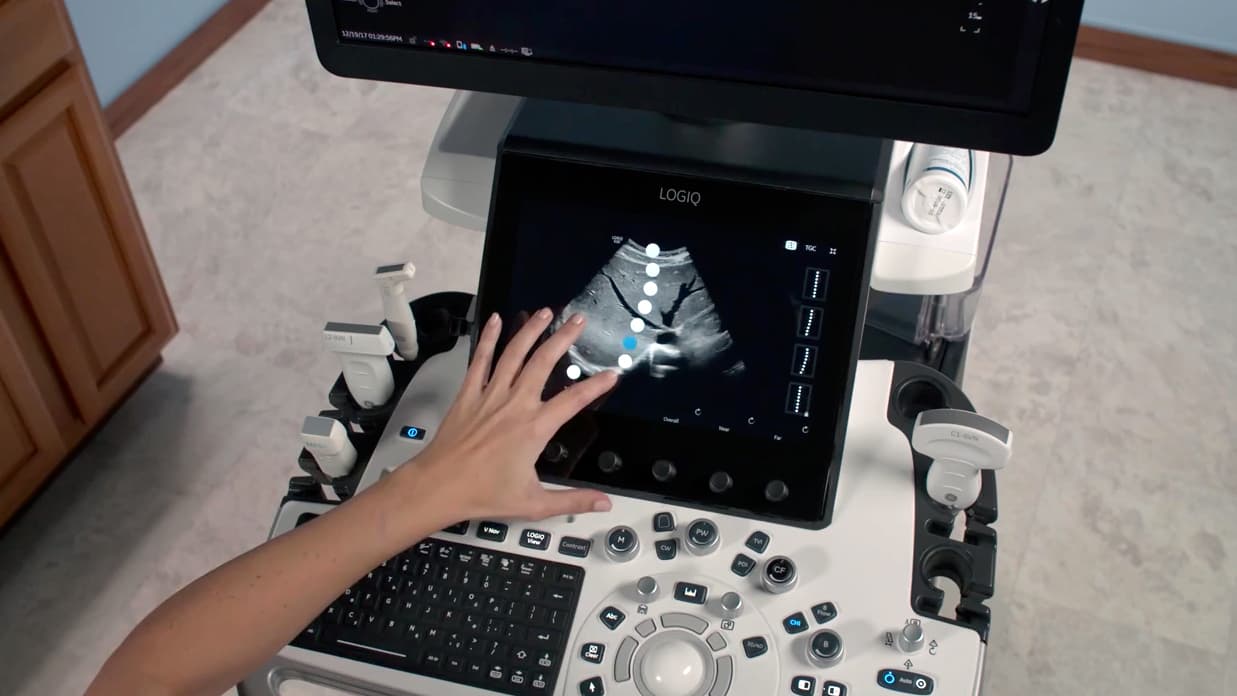
For this ultrasound system, we wanted to take advantage of the properties of the digital interface while keeping a core set of physical controls on the board so that technicians could operate the system as efficiently as possible.
Creating Harmony Across the Device’s Digital and Physical Touch Points and Feedback Mechanisms
Once we have defined the overall configuration and system architecture of the device, we start thinking about how the different hardware and software elements and user interfaces can be used in concert to safely, effectively, and efficiently operate the system.
This requires creating harmony across all of the system’s digital and physical touchpoints and its different feedback mechanisms:
-
The user provides input through their interaction with the system via its different user interface touch points
-
The system responds to the user to let them know it is working properly, or in some cases, alerts the user that it is not working properly.
In this phase, we use mid-fidelity prototypes to validate that we have achieved our design objectives. It is important at this stage that the prototyping is able to demonstrate both the hardware and software interactions.
The ultrasound system shown in the image above is an a good example of interaction development from our previous work.
Our client’s previous ultrasound system did not fully leverage its touchscreen. The client also had some concerns about moving too quickly to a fully touch-screen-based system architecture.
Working with our client, we explored what controls should remain on the physical control board of the system.
It is important at this stage that the prototyping is able to demonstrate both the hardware and the software interactions.
We had two goals:
-
Take advantage the digital interface, which also made the system easier to clean.
-
Keep a core set of physical controls on the board so that technicians could operate the system by feel based and develop muscle memory.
We determined which physical controls could be removed by analyzing usage patterns and data on what controls were being used when and in what frequency. We then explored how best to replicate those functions via the touch screen.
One complex function that we replicated via the touchscreen was the ability to adjust how the brightness of an ultrasound image at the various depths of the body—called, in medical speak, time gain compensation.
The ultrasound technician typically controls time gain compensation with physical sliders or knobs. We moved the adjustment to the touchscreen, which lets the technician perform the action on top of the ultrasound image. This created a one-to-one correlation between their interaction with the touchscreen and the effect on the ultrasound image.
As a bonus, the technician is also able to store the adjustment as a preset that they could recall later.
Phase 3: Aesthetic Refinement and Implementation
In this phase, we:
-
Create visual consistency across hardware and software that reinforces a cohesive experience.
-
Express the client’s brand and values across all user touchpoints, including packaging and IFUs.
-
Emphasize key digital and physical signifiers to optimize product affordances.
-
Validate that aesthetics enhance interaction and don’t undermine intuitive, efficient, and safe interaction via high-fidelity prototypes.
Creating a consistent visual and brand experience can also enhance the usability of the system. Aesthetic refinements should never undermine our primary design objective: to create a system that is intuitive, efficient, and safe.
Creating a Consistent Visual and Brand Experience Across Software and Hardware Touch Points
In the aesthetic refinement phase, we create shared visual brand language across the software and hardware parts of a system to enable the workflow and support the cohesiveness of the user experience.
It’s also important that our aesthetic choices at this stage enhance the usability of the system and not detract from it in any way.
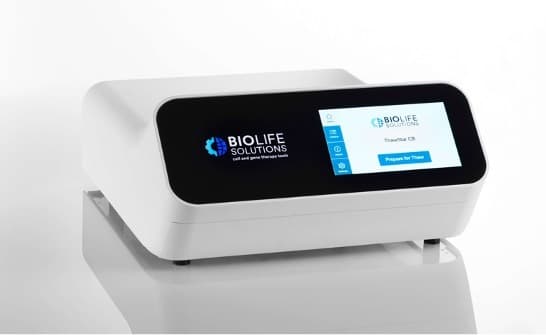
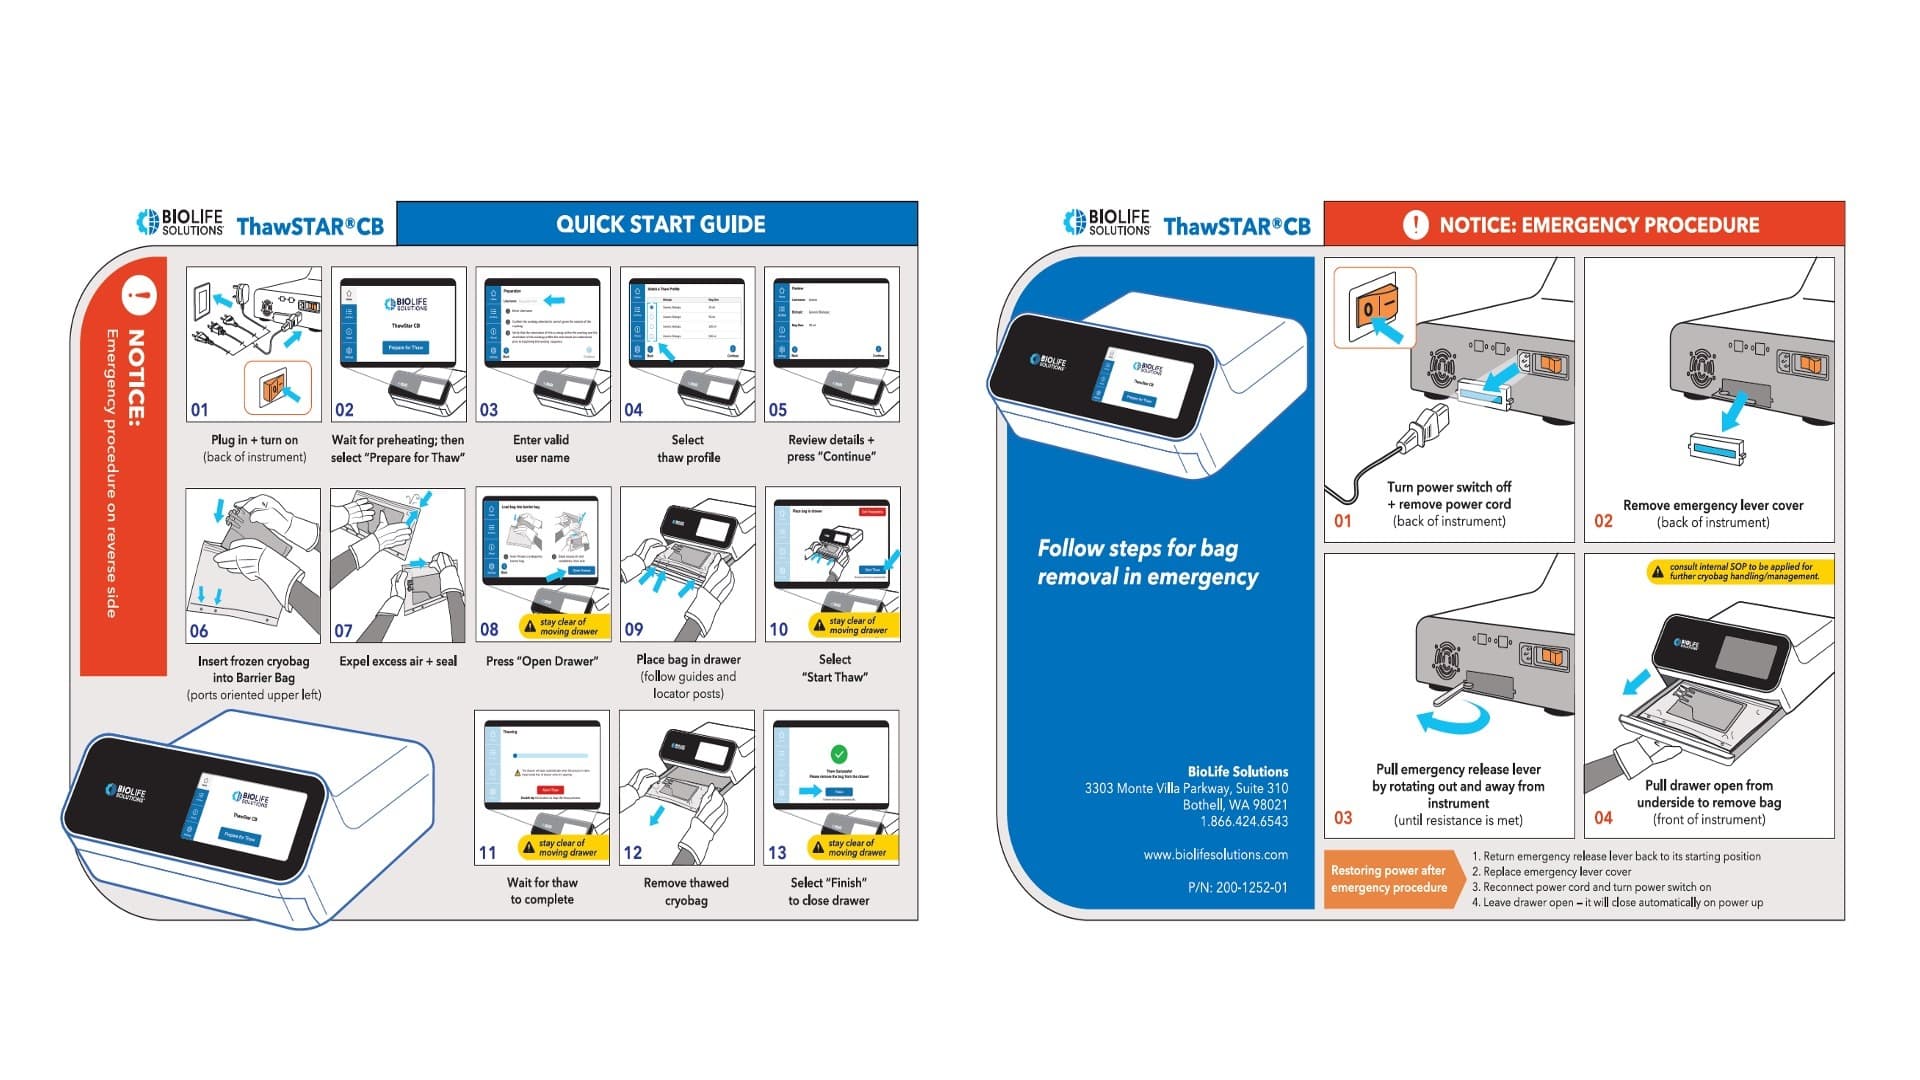
Our work on a cryo-thawing system for BioLife Solutions illustrates the importance of this. The system allows people to steadily and very carefully thaw genetic material, including stem cells, at a controlled rate. There are some safety implications to this device, because the drawer in which the genetic material is placed has pinch points and heating elements. So, it can be dangerous to use.
All these materials are opportunities to express the brand and its values, while also emphasizing key digital and physical signifiers and affordances, to make the system easier to operate.
In this phase, we applied the shared visual language and vocabulary to the BioLife system’s hardware and software, but importantly, also to the quick start guide, the instructions for use, training materials, packaging, and labeling on the product and on consumables.
All these materials were opportunities to express the brand and its values, while also emphasizing for the user what the key digital and physical signifiers and affordances are, so that the system would be easy to operate.
Because this happened later in the design process, and we were continuously iterating while increasing the fidelity of the artifacts we produced through our collaborative design work, in this phase we were also able to test higher fidelity prototypes.
This allowed us to validate that our aesthetic refinements were not undermining our primary design objective: to create a system that would be intuitive, efficient, and safe across all of the software and hardware touch points.
Cohesive digital/physical design is achievable while maintaining Interaction Design and Industrial Design as distinct, complementary disciplines, each excelling within their areas of expertise.
The Outcome: Cohesive Digital/ Physical Design
In summary, we believe that cohesive merging of digital and physical design can be achieved through:
-
Multidisciplinary participation in the Discover and Define phase. Ensure that that you have the Human Factors Engineering, Interaction Design, and Industrial Design teams involved in the research. In the Baebies case study we discussed in Part 1 of this blog post series, our client saw significant value in how this research identified opportunities that we addressed throughout the design phases of the work.
-
Co-creation of digital/physical workflows (current and future state). Again, in the case of the Baebies example, the future state workflow very much became the North Star for the design team and the client as we worked through the design detailing of the product to create a cohesive experience.
-
Using a shared design process and vocabulary across Interaction Design and Industrial Design practices. This ensures more cohesion and less siloing, while keeping these complementary disciplines distinct and allowing them to excel within their areas of expertise.
Defining a shared process and vocabulary for designing digital/physical medical devices is an ongoing endeavor at Delve. As we continue to experiment with this new approach, we hope to identify additional process improvements that yield an even more cohesive user experience.
We look forward to sharing our future findings with you.
Learn more about Delve Product Development Services for Medical Devices.
This article was originally posted on the Delve Blog and is being republished here with permission.


